Finding your laptop’s volume insufficient, even at 100%, is a common issue, especially with built-in speakers that often lack loudness. While Windows naturally caps the volume at 100% to prevent distortion and speaker damage, there are methods to increase laptop volume beyond 100% in Windows. These typically involve utilizing sound enhancements, specific media player features, or third-party volume booster software. This guide will walk you through safe and effective ways to boost your laptop’s audio output.
Understanding Volume Limitations
The 100% volume limit in Windows is a digital ceiling. Pushing sound beyond this limit, especially with software-based amplification, can introduce:
- Audio Distortion: Sounds can become crackly, fuzzy, or otherwise unpleasant.
- Speaker Damage: Prolonged use at excessive volumes can potentially damage your laptop’s internal speakers, as they are designed for specific power outputs.
- Reduced Audio Quality: Details in the audio might be lost due to clipping or over-amplification.
Always monitor the audio quality and reduce the volume if you hear distortion.
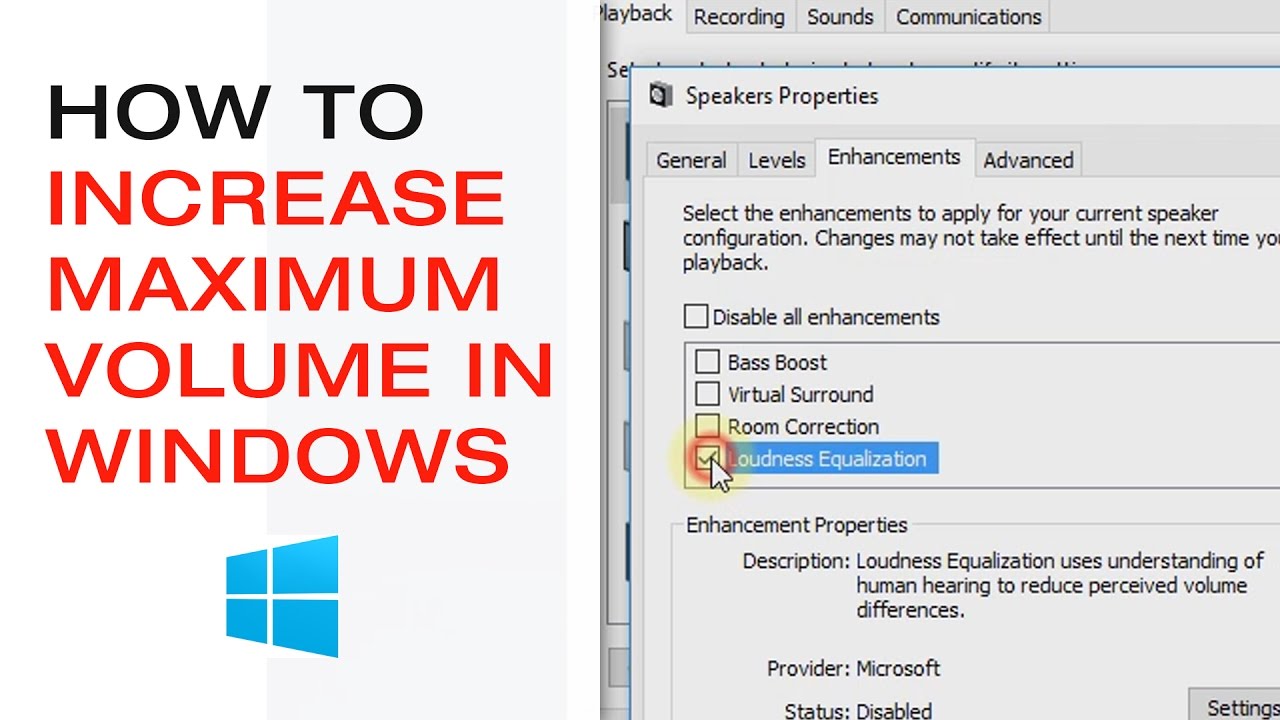
- Utilize Windows’ Built-in “Loudness Equalization”
This is a simple, often effective, built-in sound enhancement that aims to make quiet sounds louder and loud sounds more consistent, effectively increasing the perceived volume.
- Step 1: Open Sound Settings.
- Windows 11: Right-click the speaker icon in the taskbar, then select “Sound settings.”
- Windows 10: Right-click the speaker icon in the taskbar, then select “Open Sound settings.”
- Step 2: Access Sound Device Properties.
- Windows 11: Under “Output,” click on your primary output device (e.g., “Speakers (Realtek(R) Audio)”). Then scroll down and click on “Audio enhancements.”
- Windows 10: Under “Output,” click on “Sound Control Panel” (often on the right side under “Related Settings”). This opens the older Sound dialog box.
- Step 3: Navigate to the “Enhancements” Tab.
- From Sound Control Panel (Windows 10 & 11 via Sound Control Panel): In the “Playback” tab, right-click on your active speaker/headphone output device and select “Properties.”
- In the Properties window, go to the “Enhancements” tab.
- Step 4: Enable “Loudness Equalization.”
- Check the box next to “Loudness Equalization.”
- Click “Apply” then “OK” to save your changes.
- Test your audio. You should notice a general increase in perceived volume and consistency.
- Adjust Volume in Specific Media Players (Often Beyond 100%)
Many media players, especially open-source ones, have their own internal volume controls that can exceed Windows’ 100% limit. This is often the safest way to boost volume for specific content.
- VLC Media Player (Highly Recommended):
- Step 1: Download VLC Media Player. If you don’t have it, download and install it from the official VideoLAN website (videolan.org).
- Step 2: Play Audio/Video. Open your audio or video file in VLC.
- Step 3: Increase Volume. VLC’s volume slider goes up to 200% by default. Use the slider at the bottom of the player or press Ctrl + Up Arrow to increase volume beyond 100%.
- Step 4: Check for Distortion. Listen carefully for distortion. Reduce the volume slightly if the audio quality degrades.
- Other Players: Check the settings or preferences of your preferred media player. Many have similar internal volume amplification options.
- Install Realtek HD Audio Manager/Console (If Applicable)
If your laptop uses a Realtek audio chipset, installing the proper drivers and associated software often provides more advanced sound controls, including volume amplification or specialized “Loudness” settings beyond what Windows offers by default.
- Step 1: Identify Your Audio Driver.
- Right-click the Start button and select “Device Manager.”
- Expand “Sound, video and game controllers.”
- Look for “Realtek High Definition Audio” or similar.
- Step 2: Download Realtek Audio Console/Manager.
- Go to your laptop manufacturer’s support website (e.g., Dell, HP, Lenovo, Asus).
- Enter your specific laptop model number.
- Look for the latest Audio Driver package. This usually includes the Realtek Audio Console (for Windows 10/11) or Realtek HD Audio Manager (older versions).
- Step 3: Install and Configure.
- Install the downloaded driver. Reboot your laptop if prompted.
- Open the Realtek Audio Console app from your Start menu or system tray.
- Look for sections like “Sound Effect,” “Loudness,” “Volume Equalization,” or “Equalizer.” Some Realtek versions have specific sliders or checkboxes for volume amplification. Experiment with these settings to find what works best without introducing distortion.
- Use a Third-Party Volume Booster Software
For system-wide volume amplification beyond the 100% limit, dedicated third-party software can be effective.
- Recommended Software (Use with caution regarding distortion):
- FxSound (Paid, with free trial): Offers a user-friendly interface with a volume booster, equalizer, and various presets.
- Boom 3D (Paid, with free trial): Focuses on 3D surround sound but also includes a powerful volume booster and equalizer.
- Equalizer APO with Peace GUI (Free & Advanced): While primarily an equalizer, you can use its “Preamp” slider to boost the overall volume for all applications. This requires careful adjustment to avoid clipping.
- (Refer to the “How to Enable Sound Equalizer in Windows 10/11” guide for detailed installation steps for Equalizer APO and Peace GUI, then look for the “Preamp” setting.)
- General Steps for Third-Party Software:
- Step 1: Download and Install. Download the software from its official website.
- Step 2: Configure Settings. Open the installed software. Look for a “Volume Boost,” “Loudness,” or “Gain” setting.
- Step 3: Adjust Incrementally. Start with a small increase (e.g., 10-20%) and play some audio. Incrementally increase until you reach a comfortable loudness without noticeable distortion.
Important Warnings and Best Practices:
- Risk of Distortion and Damage: Pushing volume significantly beyond default limits will introduce distortion and can damage your laptop’s speakers over time. Use these methods responsibly.
- Headphones/External Speakers: For the best audio experience and loudness, consider using quality headphones or external speakers. They offer superior sound reproduction and volume levels compared to tiny built-in laptop speakers.
- Source Audio Quality: If the original audio file or stream is of poor quality, boosting the volume will only amplify the imperfections and distortion.
- Test and Listen: Always test changes with different types of audio and listen carefully for signs of distortion or crackling.
- Revert if Necessary: If you experience issues or persistent distortion, revert the changes you made.
By carefully applying these methods, you can successfully increase laptop volume beyond 100% in Windows enhancing your audio experience for those moments when the default just isn’t enough.