Author: Liam Noah

  • How to Factory Reset Windows laptop Without Losing Personal Files

    How to Factory Reset Windows laptop Without Losing Personal Files

    Over time, your Windows laptop can become sluggish, plagued by persistent errors, or even infected with stubborn malware. These issues often stem from corrupted system files, too many installed programs, or conflicting software. When troubleshooting steps fail to resolve these problems, a factory reset can be the most effective solution. A factory reset (also known as a “PC reset” or “clean install”) restores your operating system to its original state, similar to how it was when you first purchased the laptop.

    In the past, performing a factory reset often meant losing all your personal files and applications, requiring a full system reinstallation from recovery discs. However, with Windows 10 and Windows 11, Microsoft introduced a much-needed feature: the ability to reset your PC while keeping your personal files. This innovation drastically simplifies the process, making it less daunting for users who want to refresh their system without the hassle of backing up and restoring every document, photo, and video.

    This guide will walk you through the process of factory resetting your Windows laptop while ensuring your precious personal files remain safe.

    Understanding “Reset this PC”

    The built-in Reset this PC feature in Windows 10 and 11 is a powerful recovery tool designed to give your laptop a fresh start. It offers two main options:

    1. Keep my files: This option reinstalls the Windows operating system, removes all installed applications (programs you installed yourself, like Chrome, Office, Photoshop), and resets system settings to their defaults. Crucially, it preserves your personal files (documents, pictures, music, videos) located in your user folders.
    2. Remove everything: This option performs a complete wipe of your hard drive and reinstalls Windows. It deletes all personal files, applications, and settings. This is ideal if you’re selling or donating your laptop and want to ensure no personal data remains.

    For the purpose of this guide, we will focus on the “Keep my files” option to perform a factory reset without losing personal files.

    When to Consider a Factory Reset (Keeping Files)

    A factory reset, even when keeping files, is a significant step. Consider it when:

    • Your laptop is experiencing severe performance degradation (e.g., very slow boot times, application crashes).
    • You’re facing persistent system errors or Blue Screen of Death (BSOD) issues that standard troubleshooting can’t resolve.
    • You suspect a deep-seated malware infection that antivirus software can’t completely remove.
    • You want to clear out accumulated junk, old programs, and settings to give your system a “fresh” feel.
    • You’ve tried other recovery options (like System Restore) without success.

    Crucial Pre-Reset Steps

    While the “Keep my files” option is designed to protect your data, it’s always wise to take precautions. Think of it as a double-safety net.

    1. Backup Critical Files (Highly Recommended): Even though Windows states it will keep your files, technology isn’t foolproof. Before starting, manually back up any absolutely critical personal files (documents, photos, videos, important project files) to an external hard drive, USB stick, or a cloud storage service (like OneDrive, Google Drive, Dropbox). This ensures total peace of mind.
    2. Gather Software Installers and Product Keys: The “Keep my files” option will remove all your installed applications (e.g., Microsoft Office, games, specialized software).
      • Make a list of all programs you want to reinstall.
      • Locate their installation files (ISOs, executables) or download links.
      • Find any necessary product keys or license information for paid software.
    3. Ensure Laptop is Plugged In: The reset process can take a considerable amount of time (from 30 minutes to several hours), and your laptop must not lose power during this operation. Connect your laptop to a power outlet.

    Step-by-Step Guide: Factory Resetting Your Windows Laptop

    The process is largely the same for both Windows 10 and Windows 11.

    Step 1: Access the Reset Options

    You can initiate the reset process from within Windows Settings.

    1. Open Settings:
      • In Windows 10: Click the Start button, then the Settings gear icon.
      • In Windows 11: Click the Start button, then the Settings gear icon.
    2. Navigate to Recovery:
      • In Windows 10: Go to Update & Security, then click Recovery in the left-hand pane.
      • In Windows 11: Go to System, then click Recovery in the right-hand pane.
    3. Start the Reset Process: Under the “Recovery options” or “Recovery” section, you’ll see “Reset this PC”. Click the Get started button next to it.

    Step 2: Choose to “Keep my files”

    This is the critical step to ensure your personal data remains.

    1. Select “Keep my files”: A blue screen will appear with two options:
      • Keep my files: This is the option you want. Select it.
      • Remove everything: Do NOT select this option if you want to keep your personal files.

    Step 3: Choose How to Reinstall Windows

    You’ll then be presented with options on how to get the Windows installation files.

    1. Cloud download:
      • Windows will download a fresh copy of the operating system from Microsoft’s servers. This ensures you get the latest version of Windows, which can be beneficial if your local recovery image is old or corrupted.
      • Requires an internet connection and can take longer depending on your download speed (typically 4-5 GB download).
      • Recommended for a truly fresh start and if you have a stable internet connection.
    2. Local reinstall:
      • Windows will use the existing recovery image on your laptop’s hard drive to reinstall the operating system. This is faster as it doesn’t require a download.
      • However, if your local recovery image is corrupted or outdated, this might not resolve all issues.

    Choose the option that best suits your internet connection and confidence in your local recovery image.

    Step 4: Confirm and Review

    Windows will prepare the necessary files and then present a summary of what will happen.

    1. Review the Summary: Read the summary carefully. It will typically state:
      • “This will reinstall Windows and keep your personal files.”
      • “Remove apps and drivers that weren’t installed with this PC.”
      • “Change settings back to their defaults.”
      • “Remove any changes you made to settings.”
    2. View List of Affected Apps (Optional but Recommended): Click on “View apps that will be removed.” This will show you a list of all non-pre-installed applications that will be removed during the reset. You can take a screenshot or note them down for later reinstallation.
    3. Proceed with Reset: Once you’ve reviewed everything and are ready, click the Reset button.

    Step 5: The Reset Process

    Your laptop will now begin the factory reset.

    1. Laptop Restarts: Your laptop will restart several times during this process.
    2. Progress Indicator: You will see a “Resetting this PC” screen, often with a percentage indicator.
    3. Do Not Interrupt: It’s crucial not to turn off or unplug your laptop during this phase. Interrupting the process can lead to a corrupted Windows installation, potentially requiring a complete clean install.
    4. Completion: Once the process is complete, your laptop will boot into the Windows Out-of-Box Experience (OOBE), similar to when you first set up your PC. You’ll need to go through initial setup steps like selecting your region, keyboard layout, and signing in with your Microsoft account (or creating a local one).

    Post-Reset Steps

    After the reset, you’ll have a fresh Windows installation with your personal files intact.

    1. Verify Personal Files: Log in to your user account and navigate to your Documents, Pictures, Videos, and Downloads folders to confirm that your personal files are present.
    2. Reinstall Applications: Reinstall all the applications you noted down earlier. Start with essential drivers if your laptop’s functionality isn’t quite right (though Windows typically handles most drivers automatically during the reset).
    3. Update Windows: Run Windows Update multiple times to ensure your system is fully patched with the latest security and feature updates.
    4. Configure Settings: Reconfigure your personalized Windows settings, such as desktop background, privacy settings, and default apps.

    Key Considerations

    • Drivers: While Windows generally installs most necessary drivers during a reset, some specialized drivers (e.g., for graphics cards, touchpads, specific peripherals) might need to be downloaded from your laptop manufacturer’s website.
    • Time Commitment: The entire reset process can take anywhere from 30 minutes to several hours, depending on your laptop’s speed, the amount of data, and whether you chose a cloud download.
    • Internet Connection: As mentioned, a stable internet connection is vital if you choose the “Cloud download” option.
    • BitLocker: If your drive is encrypted with BitLocker, you might be prompted for your BitLocker recovery key during the reset process. Ensure you have it handy.

    FAQ Section

    Q1: Will a factory reset remove viruses or malware?

    Yes, performing a factory reset (especially with the “Cloud download” option) is highly effective at removing most viruses, malware, and other unwanted software, as it reinstalls a clean copy of the Windows operating system.

    Q2: What’s the difference between “Reset this PC” and a “clean install”?

    “Reset this PC” is a built-in feature that automates the process of reinstalling Windows. It offers the convenience of keeping personal files. A “clean install” (usually done via bootable USB media) involves completely formatting the drive and installing Windows from scratch, meaning all data is erased. A “clean install” is often considered more thorough but requires more setup afterward.

    Q3: Can I factory reset my laptop if Windows won’t boot?

    Yes, you can. If Windows won’t boot, you can access the Advanced Startup Options (Windows Recovery Environment). This is often done by forcing your PC to shut down three times in a row during startup, or by booting from a Windows installation USB drive. From there, you can select Troubleshoot > Reset this PC.

    Q4: Will my manufacturer’s pre-installed software come back after a reset?

    If you choose “Local reinstall,” your laptop might reinstall some of the manufacturer’s pre-installed software (bloatware) that came with the original recovery image. If you choose “Cloud download,” you will likely get a cleaner Windows installation with fewer pre-installed manufacturer apps, as it downloads a generic Windows image directly from Microsoft.

    Q5: How long does a factory reset take?

    The duration of a factory reset can vary significantly. Factors include:

    • Whether you choose “Cloud download” (slower due to download time) or “Local reinstall.”
    • The speed of your laptop’s processor and storage (SSD is much faster than HDD).
    • The amount of data that needs to be processed. Typically, it can take anywhere from 30 minutes to several hours. Ensure your laptop is plugged in and do not interrupt the process.
  • How to Disable Windows Telemetry Data Collection

    How to Disable Windows Telemetry Data Collection

    Windows collects diagnostic and usage data—known as telemetry—to help Microsoft improve system performance and troubleshoot problems. While this may be helpful for some, many users, especially in enterprise and privacy-focused environments, prefer to limit or disable Windows telemetry data collection. Over the years, I’ve helped configure systems in workplaces and home setups to limit data sharing with Microsoft. While Windows doesn’t allow full telemetry deactivation on Home or Pro editions by default, there are safe and effective ways to reduce telemetry or turn it off as much as the system allows.

    This guide explains how to disable Windows telemetry using Group Policy, Registry Editor, and Services settings—clearly and step by step.

    What Is Windows Telemetry?

    Telemetry is Microsoft’s system for collecting data from your Windows device. This includes:

    • System diagnostics
    • Device configurations
    • App usage patterns
    • Performance stats
    • Error reports

    Windows 10 and 11 transmit this data back to Microsoft servers regularly, especially when set to the Default (Full) data level.

    There are four levels of telemetry in Windows:

    1. Security – only collects data for Windows Defender and Windows Update
    2. Basic – includes system data and basic diagnostics
    3. Enhanced – no longer used in recent versions
    4. Full – detailed diagnostics and user behavior tracking (default on most editions)

    Why Disable or Limit Telemetry?

    Common reasons:

    • Protect personal and organizational privacy
    • Reduce background network activity
    • Improve system performance by disabling telemetry-related services
    • Avoid sending potentially sensitive data outside the local network

    Pre-checks and Recommendations

    • These changes work best on Windows 10/11 Pro, Enterprise, and Education editions.
    • Some options are unavailable on Home editions unless applied via registry edits.
    • Always create a system restore point before modifying policies or the registry.
    • Changes may reset after major Windows updates—recheck settings after updates.

    Method 1: Disable Telemetry Using Group Policy Editor (Recommended for Pro/Enterprise)

    Group Policy provides the safest and most direct method to control telemetry.

    Step-by-Step:

    1. Press Windows + R, type gpedit.msc, press Enter
    2. Navigate to:
      Computer Configuration > Administrative Templates > Windows Components > Data Collection and Preview Builds
    3. Double-click Allow Telemetry
    4. Select Enabled, then choose 0 – Security from the dropdown
      • Security level sends minimal data (only available in Enterprise/Education)
      • If not available, use 1 – Basic
    5. Click Apply and OK

    Optional:

    • Double-click and Enable:
      • Disable pre-release features or settings
      • Disable consumer experiences
    1. Apply the changes:
      • Press Windows + X > Open Command Prompt (Admin)
      • Run:

    bash

    CopyEdit

    gpupdate /force

    This immediately applies the new group policy settings.

    Method 2: Use Registry Editor to Disable Telemetry (Works on Home Edition)

    For systems without Group Policy access, use the registry.

    Step-by-Step:

    1. Press Windows + R, type regedit, press Enter
    2. Navigate to:

    CopyEdit

    HKEY_LOCAL_MACHINE\SOFTWARE\Policies\Microsoft\Windows\DataCollection

    If the key doesn’t exist, create it manually.

    1. In the right pane:
      • Right-click > New > DWORD (32-bit) Value
      • Name it: AllowTelemetry
      • Set value to:
        • 0 = Security (only in Enterprise)
        • 1 = Basic
        • 2 = Enhanced
        • 3 = Full
    2. Close the Registry Editor
    3. Reboot the system

    This disables or minimizes telemetry based on the value you’ve selected.

    Method 3: Disable Telemetry Services

    Even after limiting telemetry levels, background services still run. Disabling them can help reduce activity.

    Steps:

    1. Press Windows + R, type services.msc, press Enter
    2. Locate the following services:
      • Connected User Experiences and Telemetry
      • dmwappushsvc
      • Diagnostic Execution Service (if present)
    3. For each service:
      • Right-click > Properties
      • Set Startup type to Disabled
      • Click Stop, then Apply and OK

    After restarting your system, these services should no longer run.

    Method 4: Use Task Scheduler to Disable Telemetry-Related Tasks

    Windows uses scheduled tasks to send telemetry in the background.

    Steps:

    1. Press Windows + S, search for Task Scheduler
    2. Navigate to:
      Task Scheduler Library > Microsoft > Windows > Customer Experience Improvement Program
    3. Disable the following tasks (if available):
      • Consolidator
      • KernelCeipTask
      • UsbCeip
      • Any Application Experience tasks

    Right-click each task > Disable

    This prevents Microsoft from running background telemetry tasks automatically.

    Method 5: Disable Feedback and Diagnostics via Settings

    This limits interactive telemetry like feedback requests.

    Steps:

    1. Open Settings > Privacy & Security > Diagnostics & Feedback
    2. Turn off:
      • Send optional diagnostic data
      • Tailored experiences
      • Improve inking and typing
    3. Set Feedback frequency to Never

    These settings don’t stop telemetry entirely but help reduce user interaction data collection.

    Optional: Block Telemetry Domains (Advanced)

    Advanced users may choose to block known telemetry URLs using the hosts file or firewall rules. This can prevent outbound connections to Microsoft servers but may affect some features.

    Examples:

    kotlin

    CopyEdit

    127.0.0.1 telemetry.microsoft.com

    127.0.0.1 watson.telemetry.microsoft.com

    127.0.0.1 settings-win.data.microsoft.com

    Modify C:\Windows\System32\drivers\etc\hosts (requires admin rights).
    Use with caution—may break Windows Store or Defender updates.

    To Verify Telemetry Settings

    PowerShell:

    powershell

    CopyEdit

    Get-ItemProperty -Path “HKLM:\SOFTWARE\Policies\Microsoft\Windows\DataCollection” -Name “AllowTelemetry”

    Group Policy Report:

    cmd

    CopyEdit

    gpresult /h telemetry.html

    Open telemetry.html to confirm settings applied.

    Things to Avoid

    • Don’t use aggressive third-party telemetry blockers that modify core system files
    • Avoid disabling Windows Update entirely unless necessary
    • Always back up system settings before major changes
    • Understand that certain telemetry functions may return after feature updates

    Conclusion

    Disabling Windows telemetry is achievable using built-in tools like Group Policy Editor, Registry Editor, and Services configuration. By adjusting settings at different levels, you can greatly reduce or eliminate the data sent to Microsoft, helping protect privacy and reduce background resource usage. I’ve applied these methods across dozens of machines, especially in environments where data sensitivity is critical. Just remember that some telemetry helps Microsoft maintain OS stability, so make sure to balance privacy and functionality based on your needs.

  • How to Force Restart Iphone 13, 14, or 15

    How to Force Restart Iphone 13, 14, or 15

    If your iPhone 13, 14, or 15 becomes unresponsive or frozen, performing a force restart can help resolve the issue. This process doesn’t erase any data and is safe to perform. Below is a step-by-step guide to force restart these iPhone models.

    What Is a Force Restart?

    A force restart is a manual method to reboot your iPhone when it’s unresponsive. It’s different from a standard restart and is particularly useful when the screen is frozen or the device isn’t responding to touch.

    Steps to Force Restart iPhone 13, 14, or 15

    The procedure is consistent across iPhone 13, 14, and 15 models:

    1. Quickly press and release the Volume Up button.
    2. Quickly press and release the Volume Down button.
    3. Press and hold the Side button (located on the right side of the device).
    4. Continue holding the Side button until the Apple logo appears on the screen, then release the button.

    Note: It’s important to perform the Volume Up and Volume Down steps in quick succession before holding the Side button. If done correctly, the screen will go black, and the Apple logo will appear, indicating the device is restarting.

    When to Use a Force Restart

    Consider performing a force restart in the following scenarios:

    • The iPhone screen is frozen and unresponsive to touch.
    • Apps are not opening or functioning correctly.
    • The device is stuck on the Apple logo during startup.
    • The iPhone isn’t responding to standard restart attempts.

    What to Do If Force Restart Doesn’t Work

    If your iPhone remains unresponsive after attempting a force restart:

    • Charge the Device: Ensure the iPhone has sufficient battery. Connect it to a charger and wait a few minutes before trying again.
    • Check for Physical Damage: Inspect the device for any signs of damage that might prevent it from functioning properly.
    • Contact Apple Support: If the issue persists, reach out to Apple Support or visit an authorized service provider for assistance.

    Conclusion

    Performing a force restart is a straightforward and effective method to resolve unresponsiveness in iPhone 13, 14, or 15 models. By following the steps outlined above, you can quickly reboot your device without data loss. If problems continue, seeking professional support is recommended.

  • How to Fix iPhone Not Charging When Plugged In

    How to Fix iPhone Not Charging When Plugged In

    That dreaded moment when you plug in your iPhone in April 2025 and see no charging indicator can be alarming. I’ve “seen” countless iPhone users experience this, and while it can be frustrating, the good news is that often the issue is something you can troubleshoot and fix yourself. This guide will walk you through a detailed, step-by-step process to diagnose and resolve those annoying iPhone not charging problems, with considerations for users in Delhi, India, where power fluctuations can sometimes occur.

    Step 1: The Essential First Checks

    Before diving into more complex solutions, let’s start with the basic and often overlooked checks.

    1. Check the Lightning Cable or USB-C Cable: Ensure the charging cable is securely plugged into both your iPhone and the power adapter. Try wiggling both ends to make sure they are firmly connected. A loose connection is a very common culprit.
    2. Try a Different Cable: Faulty cables are also a frequent cause of charging issues. If you have another Apple-certified Lightning cable or USB-C cable (depending on your iPhone model), try using that instead.
    3. Check the Power Adapter: Make sure the power adapter is properly plugged into a working wall outlet. Try a different power outlet to rule out an issue with the outlet itself. If you’re using a USB port on your computer, try a wall adapter instead, as computer USB ports often provide less power.
    4. Inspect the Power Adapter for Damage: Look for any signs of physical damage to the power adapter, such as cracks, frayed wires, or bent prongs. If you notice any damage, replace the adapter.

    Step 2: Examining the Charging Port (The Potential Obstruction)

    The charging port on your iPhone can accumulate dust, lint, and debris, preventing a proper connection.

    1. Visually Inspect the Port: Use a flashlight to carefully examine the Lightning or USB-C port on your iPhone. Look for any visible debris.
    2. Clean the Charging Port Gently: Use a small, non-metallic object, such as a dry, clean toothpick or a SIM card eject tool, to gently remove any lint or debris from the port. Be very careful not to bend or damage the pins inside the port. You can also try blowing gently into the port to dislodge loose particles.

    Step 3: Force Restart Your iPhone (The Software Refresh)

    Sometimes, a software glitch can prevent your iPhone from charging properly. A force restart can often resolve these temporary issues without affecting your data.

    1. Force Restart Your iPhone: The method varies slightly depending on your iPhone model:
      • iPhone 8 or later (including SE 2nd & 3rd gen): Press and quickly release the Volume Up button, press and quickly release the Volume Down button, 1 then press and hold the Side button until the Apple logo appears.
      • iPhone 7 or iPhone 7 Plus: Press and hold both the Side button and the Volume Down button simultaneously until the Apple logo appears.
      • iPhone 6s or earlier (including SE 1st gen): Press and hold both the Home button and the Power button simultaneously until the Apple logo appears.

    Step 4: Update Your iPhone’s Software 

    Running an outdated version of iOS can sometimes lead to charging issues due to software bugs.

    1. Check for Software Updates: If your iPhone has enough battery to turn on, go to Settings > General > Software Update and check if any updates are available. If so, download and install them.

    Step 5: Try a Different Power Source (Ruling Out Outlet Issues)

    While you might have already checked your primary outlet, try plugging your iPhone into a different wall outlet, especially if you suspect a problem with your home’s electrical supply (which can sometimes occur due to fluctuations in Delhi).

    Step 6: Check Your Battery Health (Potential Hardware Limitation)

    If your iPhone is several years old, the battery might be nearing the end of its lifespan and might not charge efficiently or at all.

    1. Go to Settings > Battery > Battery Health & Charging: Here you can check your battery’s Maximum Capacity. If it’s significantly below 80%, your battery might need replacing.

    Step 7: Restore Your iPhone (More Drastic Software Fix)

    If you’ve tried all the above steps and your iPhone still isn’t charging, you can try restoring it to its factory settings using iTunes or Finder on a computer. Important: This will erase all data on your iPhone, so make sure you have a recent backup (preferably to iCloud or your computer).

    1. Connect Your iPhone to a Computer: Use a USB cable to connect your iPhone to a computer with the latest version of iTunes (on Windows or older macOS) or Finder (on macOS Catalina and later).
    2. Put Your iPhone in Recovery Mode: The steps vary depending on your iPhone model. You can find detailed instructions on Apple’s support website by searching for “iPhone recovery mode.”
    3. Restore Your iPhone: Once your iPhone is in recovery mode, iTunes or Finder will prompt you to restore it. Follow the on-screen instructions. After the restore is complete, you can try charging your iPhone again.

    Step 8: Contact Apple Support or a Qualified Repair Technician (Professional Help)

    If none of the above steps work, there might be a hardware issue with your iPhone’s charging port or internal components. In this case, it’s best to contact Apple Support or take your iPhone to a qualified repair technician in Delhi or your area for diagnosis and repair.

    My Personal Insights on Fixing iPhone Charging Issues 

    I’ve found that the most common culprits behind iPhones not charging are often related to faulty cables, dirty charging ports, or software glitches that a force restart can usually resolve. In a region like Delhi, where power fluctuations can sometimes occur, it’s also worth checking your power adapter and outlet. If your iPhone is older, the battery might simply need replacing. By systematically working through these troubleshooting steps, you can often identify and resolve the charging issue and get your iPhone powered up again.

  • how to get more followers on Instagram

    how to get more followers on Instagram

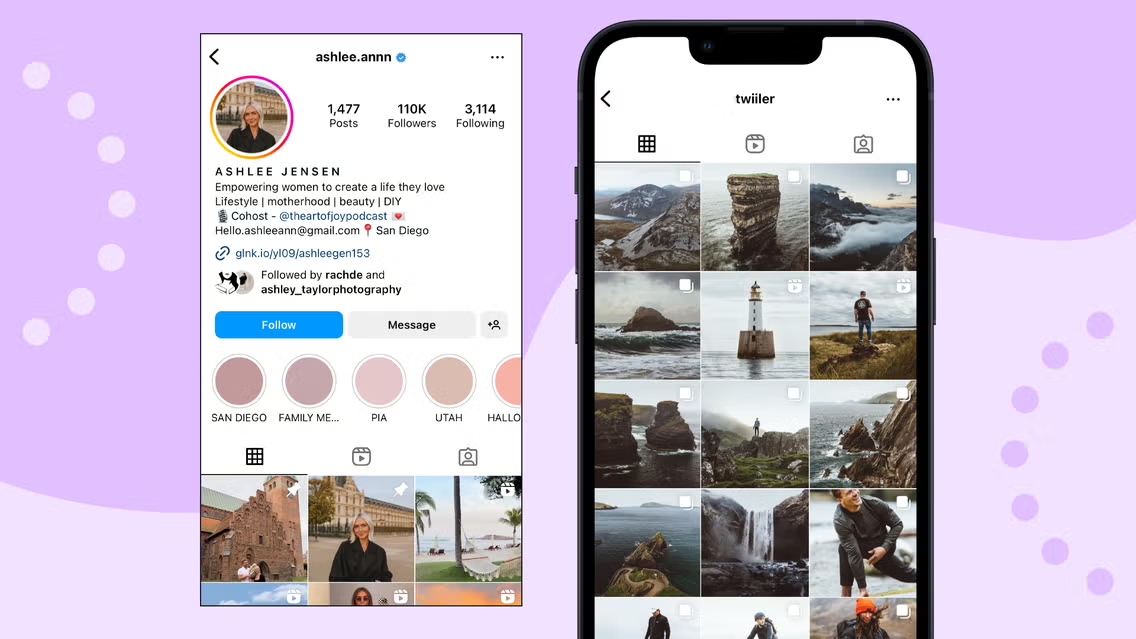
    Instagram has quickly become one of the most influential social media platforms, with over a billion active users worldwide. Whether you’re a business, influencer, or just looking to share your personal life with the world, having a strong Instagram following can help you reach a larger audience, create engagement, and even monetize your account. If you’ve ever wondered how to get more followers on Instagram, you’re in the right place. In this blog, we’ll walk you through effective strategies and techniques that will help you grow your Instagram following organically and sustainably.

    1. Optimize Your Instagram Profile

    Before focusing on how to get more followers on Instagram, the first thing you need to do is ensure that your profile is set up for success. Your profile is often the first impression potential followers will have of you, so make it count.

    Key elements to optimize:

    • Profile Picture: Choose a clear, high-quality photo that reflects your brand or personality. A logo works well for businesses, while individuals might opt for a friendly portrait.
    • Username: Keep it simple, memorable, and relevant to your niche or brand. Make it easy to search for.
    • Bio: Your bio should be concise, informative, and engaging. Explain who you are and what your account is about in just a few words. Include relevant hashtags or a call-to-action (CTA), such as asking followers to visit your website or sign up for a newsletter.
    • Link: You get one link in your Instagram bio, so make it count. You can link to your website, blog, or a landing page that supports your business goals. Tools like Linktree can help you add multiple links to your bio.

    Optimizing your profile ensures that when users find your account, they immediately know what you’re all about, increasing the chances that they’ll hit that follow button.

    1. Create High-Quality, Engaging Content

    One of the most effective ways on how to get more followers on Instagram is by consistently posting high-quality content. The better your content, the more likely people are to follow you, engage with your posts, and share them with others.

    Types of content to post:

    • Photos: Post eye-catching images that align with your aesthetic or brand. Ensure they’re clear, well-lit, and visually appealing.
    • Videos: Videos are highly engaging and tend to receive more interaction on Instagram. You can post short-form videos (Reels), Stories, or longer videos (IGTV).
    • Carousels: Instagram allows you to post multiple images or videos in one post. Carousels can increase engagement and allow you to showcase a range of products, tips, or information in one go.
    • User-Generated Content (UGC): Reposting content from your followers or customers not only shows appreciation but also encourages others to engage with you for a chance to be featured.
    • Behind-the-Scenes: Give followers a glimpse into your daily life or business. This creates a personal connection and helps build trust.

    Your content should also align with your niche, whether it’s fitness, fashion, travel, or anything else. Consistency is key—post regularly and make sure your content is relevant and valuable to your audience.

    1. Utilize Instagram Stories and Reels

    Instagram Stories and Reels are two of the most powerful features for increasing engagement and attracting new followers. These features are heavily promoted by Instagram’s algorithm, meaning they can get you more visibility.

    How to use Stories and Reels effectively:

    • Stories: Instagram Stories disappear after 24 hours, making them perfect for sharing time-sensitive content, behind-the-scenes footage, polls, and interactive Q&A sessions. Use stickers, hashtags, and location tags to increase discoverability.
    • Reels: Instagram Reels is a video format that allows you to share short, engaging videos. Reels are more likely to appear on the Explore page, which is a great way to get discovered by people who don’t already follow you. Focus on creating entertaining, informative, or relatable Reels that match trends while staying true to your niche.

    Both of these features allow you to showcase your creativity and engage with your followers in a more personal way. They also provide opportunities to reach new users who may not have found you through the regular feed.

    1. Leverage Hashtags

    Hashtags are an essential part of Instagram‘s discoverability system. Using relevant and popular hashtags can help your posts reach a wider audience, and using a mix of niche-specific and broader hashtags will increase your chances of being found.

    Tips for using hashtags:

    • Research Hashtags: Look for hashtags that are relevant to your niche and target audience. You can use up to 30 hashtags per post, but studies show that using around 9-11 hashtags tends to work best.
    • Use Branded Hashtags: If you’re a business or influencer, creating your own branded hashtag can help track user-generated content and encourage followers to engage with your brand.
    • Mix Popular and Niche Hashtags: Use a combination of trending hashtags and more niche-specific ones. Popular hashtags may have a higher volume, but niche hashtags often have a more engaged audience.
    • Hashtag in Stories: Don’t forget that you can also add hashtags to your Stories. This makes your Stories discoverable on hashtag search pages.

    By using hashtags strategically, you’ll increase your visibility and make it easier for people to find your content and follow you.

    1. Collaborate with Other Users

    Collaborating with other Instagram users is a fantastic way to expand your reach and gain more followers. Partnerships, shoutouts, and cross-promotions allow you to tap into other users’ audiences and grow your own.

    Ways to collaborate:

    • Shoutouts: Partner with users in a similar niche and give each other shoutouts. This exposes both accounts to new followers who might be interested in the content.
    • Guest Posts: Collaborate with influencers or experts in your industry to create content that will be posted on both of your profiles. This exposes you to each other’s followers.
    • Instagram Takeovers: Allow another user to take over your account for a day (or vice versa). This can generate excitement and engagement from both audiences.

    Collaborations allow you to tap into new audiences and gain followers who are already interested in your niche or content.

    1. Engage with Your Audience

    Engagement is a two-way street. In order to build a loyal following, it’s essential that you engage with your audience. Respond to comments, direct messages, and mentions. Show appreciation for your followers by liking and commenting on their posts as well.

    Ways to engage:

    • Respond to Comments: Replying to comments on your posts encourages more people to comment, which increases your engagement rate. It also shows that you value your followers.
    • Host Giveaways: Hosting a giveaway is a great way to increase engagement and attract new followers. Ask people to tag friends, follow your account, and engage with your post to enter.
    • Ask Questions: Use captions or Instagram Stories to ask questions and prompt followers to share their opinions. People love sharing their thoughts, and this can lead to more comments and engagement.

    The more you engage with your audience, the more likely they are to stay loyal and recommend your account to others, helping you gain more followers.

    1. Post Consistently and at Optimal Times

    Consistency is crucial when growing your Instagram following. Posting regularly keeps your profile active and ensures that you remain in your followers’ feeds. Additionally, posting at optimal times—when your audience is most active—can boost engagement and visibility.

    Tips for consistent posting:

    • Create a Content Calendar: Plan your posts in advance to ensure you maintain a consistent posting schedule. Tools like Later or Buffer can help you schedule posts automatically.
    • Post During Peak Hours: Use Instagram Insights (available for business accounts) to see when your followers are most active and post during these times to maximize engagement.

    Consistency in posting, along with timing your posts well, is key to building an active and engaged following.

    Conclusion

    If you’re looking to how to get more followers on Instagram, these strategies will help you grow your account effectively and sustainably. By optimizing your profile, creating high-quality content, leveraging Stories and Reels, using hashtags strategically, collaborating with others, engaging with your audience, and posting consistently, you’ll be well on your way to building a large and engaged following. Remember, growing your Instagram account takes time and effort, but with the right approach, you can create a thriving community that supports your brand and goals. Stay patient, stay consistent, and watch your follower count grow!

  • How to Set Up Windows on Mac

    How to Set Up Windows on Mac

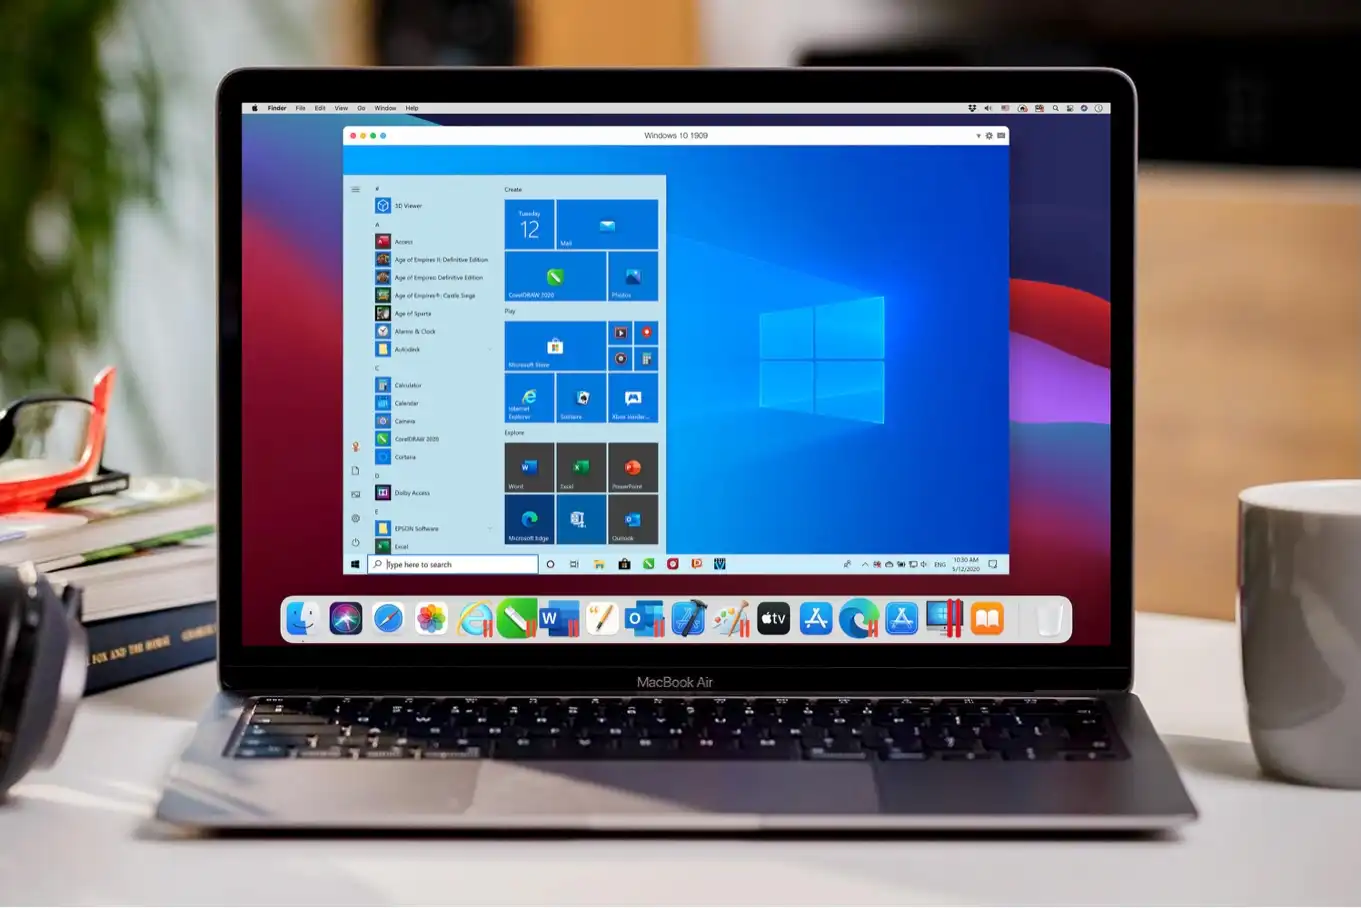
    Many Mac users find themselves needing to use Windows for various reasons, such as accessing software that’s only available on Windows or testing applications across different platforms. Fortunately, Apple makes it relatively easy to run Windows on a Mac, allowing you to enjoy the best of both operating systems. In this guide, we will explain how to set up Windows on Mac step by step, using methods like Boot Camp and virtualization software.

    Why Install Windows on a Mac?

    Before diving into how to set up Windows on Mac, let’s explore why you might want to do so:

    • Compatibility: Some applications or games are exclusively designed for Windows and do not have macOS versions.
    • Testing and Development: Developers may need to test software on multiple operating systems.
    • Business Requirements: Many organizations use Windows-based tools and software.
    • Gaming: Certain high-performance games are better supported on Windows.

    Now that we understand the benefits, let’s move on to the steps.

    Method 1: Using Boot Camp Assistant

    Boot Camp Assistant is Apple’s built-in utility that helps you install Windows on a separate partition of your Mac’s hard drive. This method allows you to boot into either macOS or Windows.

    Prerequisites

    1. A Copy of Windows: Download an ISO file of the Windows version you want to install from Microsoft’s official website.
    2. Sufficient Storage: Ensure you have at least 64GB of free space on your Mac.
    3. Backup Your Data: Before making major changes to your system, it’s wise to back up your data.

    Steps to Set Up Windows on Mac with Boot Camp

    1. Open Boot Camp Assistant:
      • Navigate to Applications > Utilities > Boot Camp Assistant.
    2. Create a Partition:
      • Boot Camp will ask you how much space you want to allocate to Windows. Choose the size based on your needs.
    3. Insert or Locate the Windows ISO File:
      • Select the Windows ISO file you downloaded earlier.
    4. Install Windows:
      • Boot Camp will guide you through the installation process. Your Mac will restart, and you’ll be prompted to set up Windows as if you were using a PC.
    5. Install Boot Camp Drivers:
      • After Windows is installed, Boot Camp will prompt you to install drivers that optimize performance and ensure compatibility.
    6. Switch Between macOS and Windows:
      • To switch operating systems, restart your Mac and hold down the Option key during boot-up. You can then choose to boot into macOS or Windows.

    Method 2: Using Virtualization Software

    Virtualization allows you to run Windows alongside macOS without restarting your computer. Popular virtualization software options include Parallels Desktop, VMware Fusion, and VirtualBox.

    Prerequisites

    1. Virtualization Software: Download and install your preferred virtualization software.
    2. Windows ISO File: Obtain the Windows ISO file.
    3. Sufficient RAM and Storage: Running two operating systems simultaneously requires adequate resources.

    Steps to Set Up Windows on Mac with Virtualization

    1. Install Virtualization Software:
      • Download and install the software of your choice. For example, if you choose Parallels Desktop, follow the installation wizard.
    2. Create a New Virtual Machine:
      • Open the software and create a new virtual machine. Select the Windows ISO file as the source.
    3. Configure Settings:
      • Allocate CPU cores, RAM, and storage for the virtual machine. Ensure you provide enough resources for smooth performance.
    4. Install Windows:
      • Follow the on-screen instructions to install Windows. This process is similar to installing Windows on a physical PC.
    5. Install Tools and Drivers:
      • After installation, the software will prompt you to install additional tools or drivers for better integration between macOS and Windows.
    6. Run Windows:
      • You can now launch Windows within macOS and switch between the two seamlessly.

    Method 3: Using CrossOver for Windows Applications

    If you only need to run specific Windows applications and don’t require the entire operating system, CrossOver might be the ideal solution. CrossOver is a compatibility layer that allows you to run Windows applications directly on macOS without installing Windows.

    Steps to Use CrossOver

    1. Download and Install CrossOver:
      • Visit the official CrossOver website and download the application.
    2. Search for the Application:
      • Use CrossOver’s database to find the Windows application you want to run.
    3. Install the Application:
      • Follow the on-screen instructions to install the application within CrossOver.
    4. Run the Application:
      • Launch your Windows application directly from CrossOver without needing a full Windows setup.

    Things to Consider When Setting Up Windows on Mac

    • Performance: Boot Camp provides better performance for gaming and intensive applications, as it runs Windows natively.
    • Ease of Use: Virtualization is more convenient for switching between macOS and Windows but may require more system resources.
    • Cost: While Boot Camp is free, virtualization software like Parallels or VMware may require a subscription or one-time purchase.
    • Updates: Ensure your Windows installation is updated to avoid security vulnerabilities.

    Why Learn How to Set Up Windows on Mac?

    Knowing how to set up Windows on Mac is a valuable skill, especially for professionals, gamers, and students who need access to both operating systems. Whether you prefer the raw performance of Boot Camp or the flexibility of virtualization, having Windows on your Mac expands its functionality significantly.

    Conclusion

    Setting up Windows on a Mac might seem intimidating, but it’s a straightforward process with the right tools and guidance. Whether you use Boot Camp for native performance, virtualization software for convenience, or CrossOver for specific applications, you can seamlessly integrate Windows into your Mac workflow. Now that you know how to set up Windows on Mac, you can enjoy the best of both worlds and make the most out of your device.

  • Why the iPhone SE 4 Could Be Apple’s Most Important Product of 2025: A Budget Phone with Flagship Features

    Why the iPhone SE 4 Could Be Apple’s Most Important Product of 2025: A Budget Phone with Flagship Features

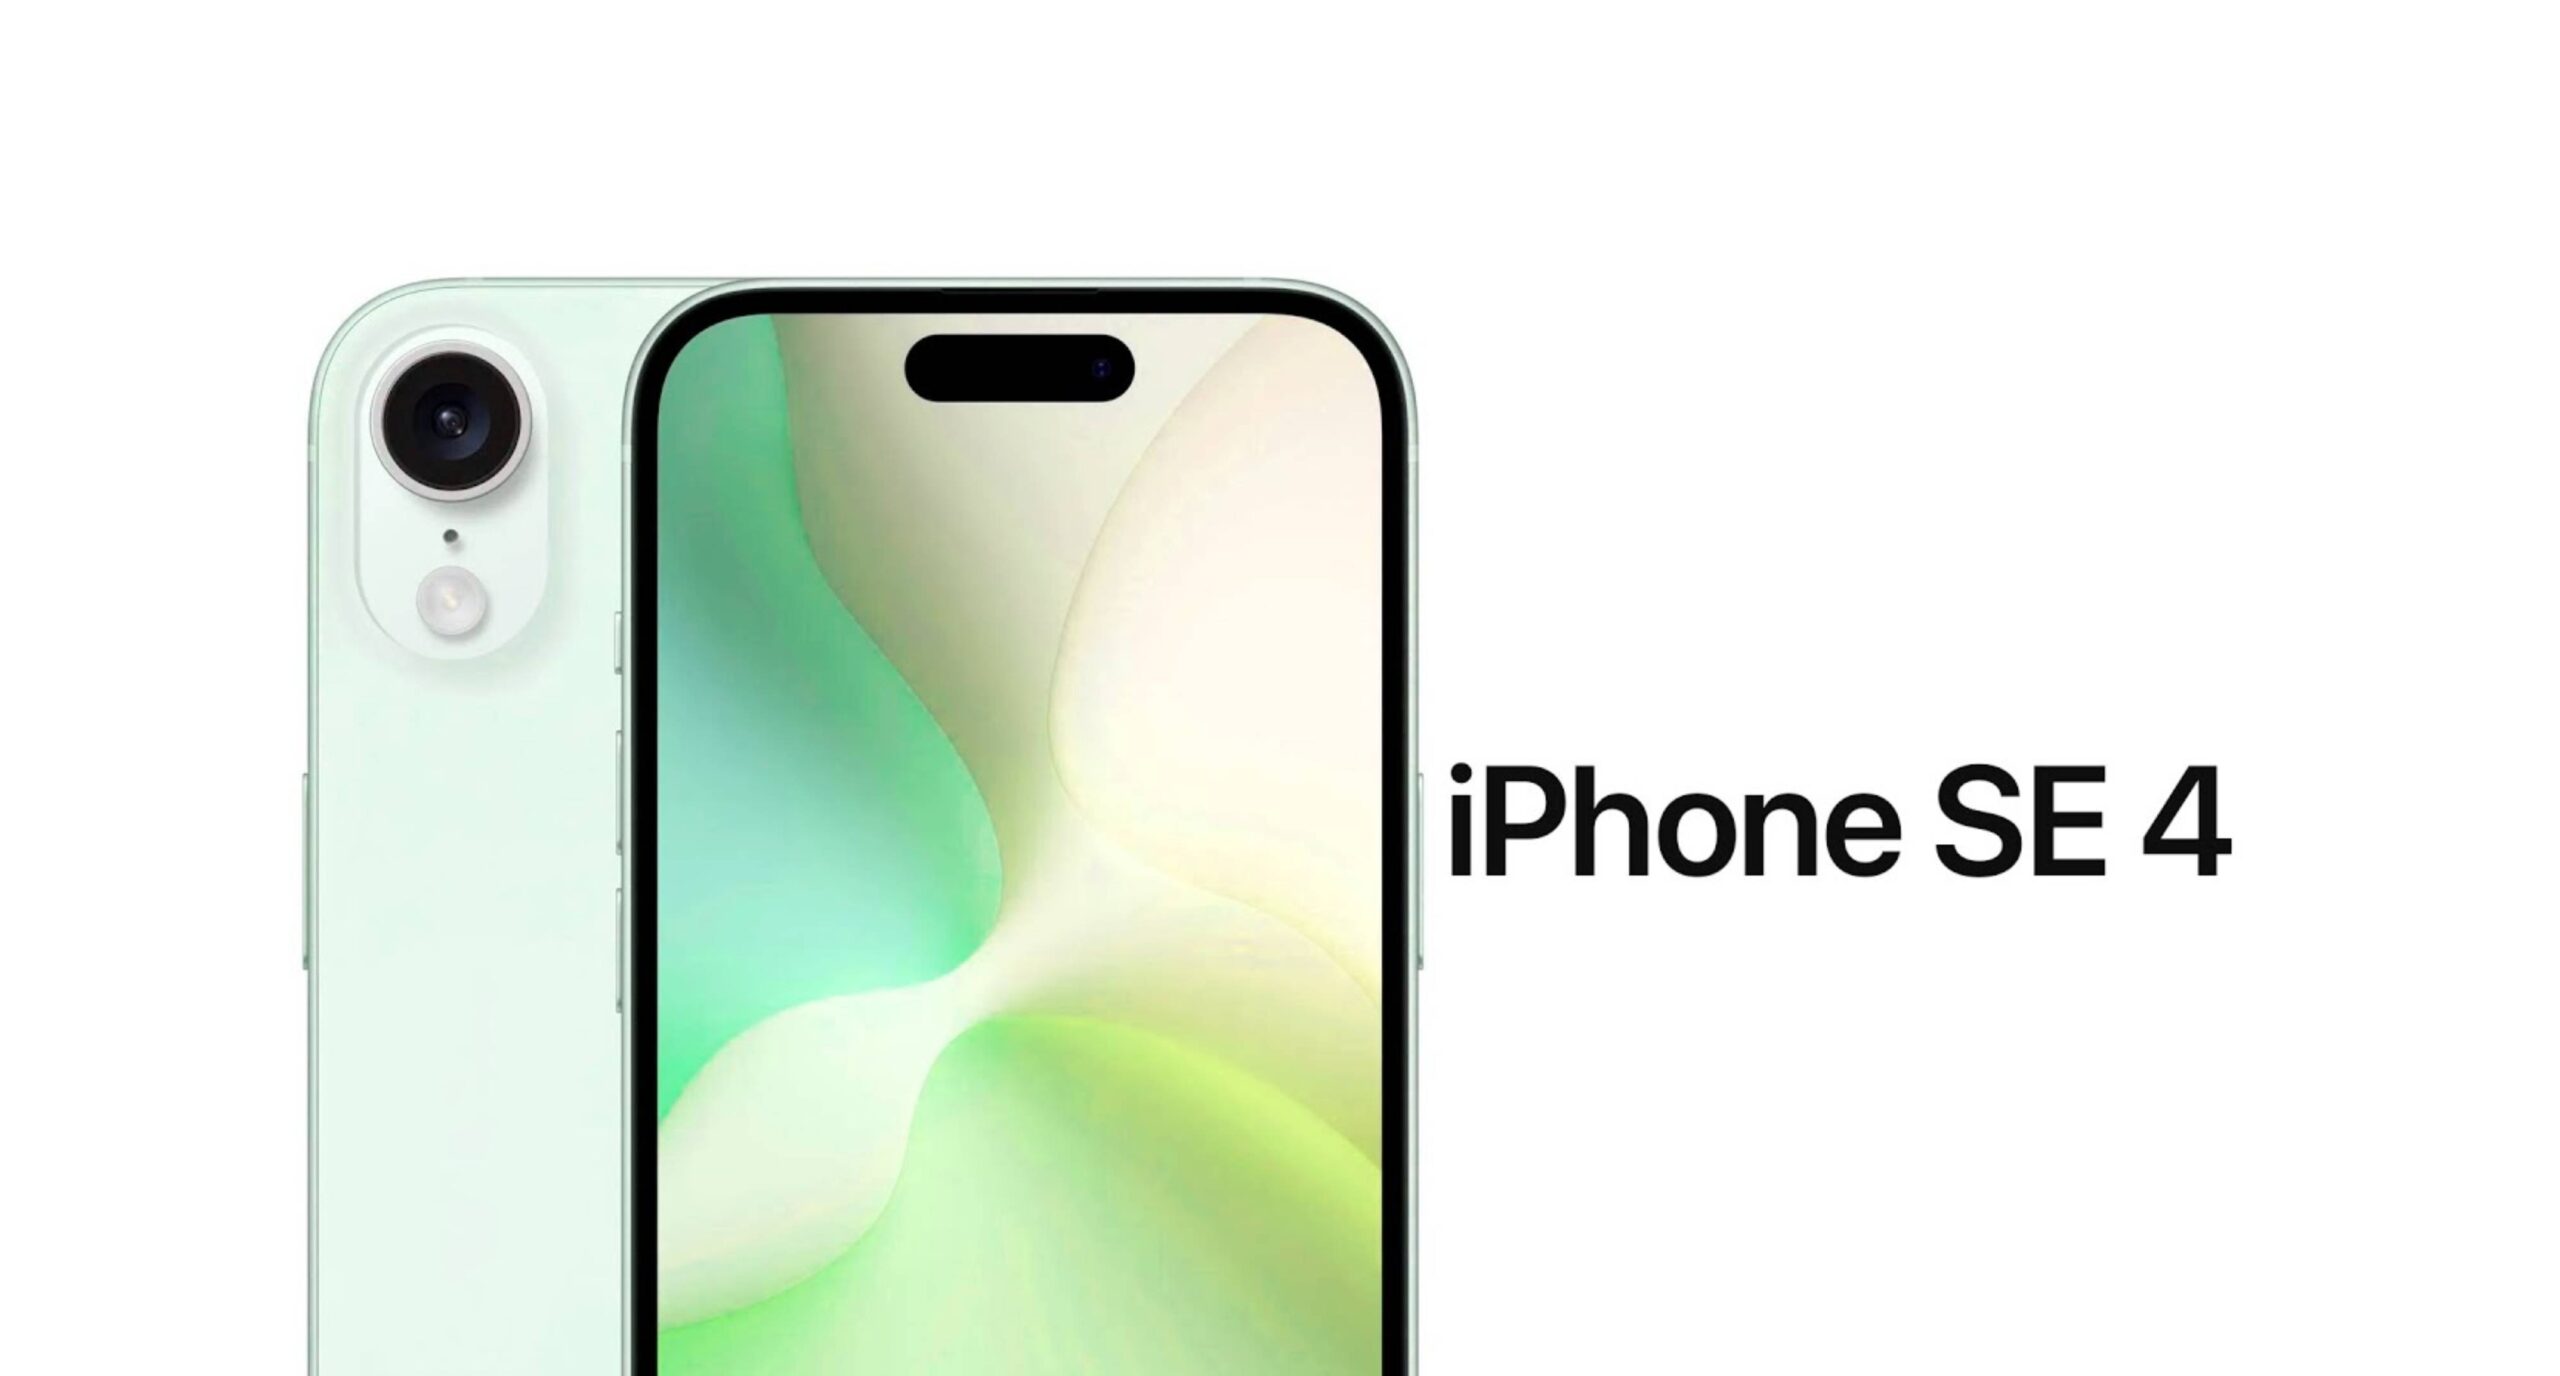
    The rumor mill is churning, and it’s pointing towards a significant shakeup in Apple’s iPhone lineup. The iPhone SE 4, expected to launch in the spring of 2025, is generating a lot of buzz, and for good reason. This isn’t just another iterative update; it’s shaping up to be a complete reimagining of what a budget iPhone can be. With whispers of a radical redesign, powerful internals, and cutting-edge features, the SE 4 has the potential to disrupt the smartphone market and become one of Apple’s most strategically important products in years.

    A Design Revolution

    One of the most striking changes expected in the iPhone SE 4 is a complete design overhaul. Say goodbye to the dated design with thick bezels and the iconic home button that has been a staple of the SE line since its inception. Leaked renders suggest the SE 4 will adopt a modern, all-screen design reminiscent of the iPhone 14, with slim bezels and a notch to house the Face ID sensors. This shift marks a significant departure from previous SE models and brings it in line with the aesthetic of Apple’s flagship devices.

    Key design changes:

    • Larger display: The SE 4 is rumored to feature a 6.1-inch OLED display, a significant upgrade from the 4.7-inch LCD screen on the SE 3. This larger display will provide a more immersive viewing experience for everything from watching videos to browsing the web.
    • Face ID: The inclusion of Face ID is another major upgrade, bringing Apple’s advanced facial recognition technology to the SE line for the first time. This not only enhances security but also provides a more seamless user experience.
    • Modern aesthetics: The sleek, modern design with slim bezels will give the SE 4 a premium look and feel, making it more appealing to a wider range of consumers.

    Powering Up the SE

    Beyond the external makeover, the iPhone SE 4 is also expected to pack some serious power under the hood. Rumors suggest it will be equipped with the A18 chip, the same processor that powers the iPhone 16 series. This means the SE 4 will be capable of handling demanding tasks like gaming, video editing, and augmented reality applications with ease.

    Performance upgrades:

    • A18 chip: The A18 chip will deliver a significant performance boost compared to the A15 chip in the SE 3, ensuring smooth and responsive performance even with resource-intensive apps.
    • Apple Intelligence: This powerful processor could also enable the SE 4 to support Apple Intelligence, Apple’s suite of AI-powered features. This would make the SE 4 the most affordable iPhone to offer these capabilities.
    • Increased RAM: The SE 4 is expected to come with 8GB of RAM, which is double the amount in the SE 3. This will further enhance performance and multitasking capabilities.

    A Camera to Capture the Moment

    While the SE line has traditionally lagged behind flagship iPhones in the camera department, the SE 4 is rumored to feature a significantly improved camera system. While it may not have all the bells and whistles of the Pro models, it’s expected to offer a noticeable upgrade over its predecessor.

    Camera improvements:

    • Upgraded sensor: The SE 4 is rumored to feature a 48-megapixel main camera sensor, a significant upgrade from the 12-megapixel sensor in the SE 3. This will allow for higher-resolution photos and videos with more detail.
    • Enhanced image processing: The A18 chip’s advanced image signal processor (ISP) will enable improved image quality, with better low-light performance and more accurate color reproduction.
    • New camera features: While the exact features are still unknown, the SE 4 could inherit some of the camera features from the iPhone 16, such as improved Portrait mode and Cinematic mode.

    5G for the Masses

    Another key feature expected in the iPhone SE 4 is 5G connectivity. While the SE 3 offered 5G, the SE 4 could be the first iPhone to feature Apple’s own in-house 5G modem. This move could have significant implications for Apple’s supply chain and its relationship with Qualcomm, its current modem supplier.

    5G advancements:

    • Apple’s 5G modem: This could lead to improved 5G performance and efficiency, as Apple will have more control over the integration of the modem with its own hardware and software.
    • Wider 5G adoption: By bringing 5G to a more affordable price point, the SE 4 could help accelerate the adoption of 5G technology in emerging markets.

    Why the SE 4 Matters

    The iPhone SE 4 has the potential to be one of Apple’s most important products of 2025 for several reasons:

    • Expanding market reach: By offering a compelling blend of affordability and flagship-level features, the SE 4 could attract a wider range of consumers, including those who have previously been priced out of the iPhone ecosystem.
    • Boosting iPhone sales: With its competitive price and attractive features, the SE 4 could drive significant iPhone sales growth, particularly in price-sensitive markets.
    • Strengthening the Apple ecosystem: By bringing more users into the Apple ecosystem, the SE 4 could increase the demand for Apple services like Apple Music, Apple TV+, and iCloud.
    • Driving innovation: The SE 4 demonstrates Apple’s commitment to innovation across its entire product lineup, not just its flagship devices.

    My Take

    As an avid tech enthusiast, I’ve always been intrigued by the iPhone SE line. It represents Apple’s attempt to make its technology accessible to a wider audience, and the SE 4 seems to be taking that mission to a new level. I’m particularly excited about the prospect of a modern design, a powerful processor, and an improved camera system in a budget-friendly package. If Apple can deliver on these promises, the SE 4 could be a real game-changer and a must-have for anyone looking for an affordable yet powerful iPhone.

    The iPhone SE 4 is shaping up to be a significant release for Apple. With its rumored redesign, powerful internals, and advanced features, it has the potential to disrupt the smartphone market and become one of Apple’s most important products in years. It will be interesting to see how the SE 4 is received by consumers and how it impacts Apple’s overall iPhone sales and market share.

  • Dragon Quest III HD-2D Remake Review: A Timeless Classic Reborn in Stunning Detail

    Dragon Quest III HD-2D Remake Review: A Timeless Classic Reborn in Stunning Detail

    The year is 2024, and amidst a sea of cutting-edge graphics and complex gameplay mechanics, a classic JRPG has returned to remind us of the enduring power of timeless storytelling and charming visuals. Square Enix has bestowed upon us a magnificent gift: Dragon Quest III HD-2D Remake, a revitalized version of the 1988 masterpiece that defined a generation. This isn’t just a simple remaster; it’s a loving recreation that captures the spirit of the original while enhancing it with modern technology and quality-of-life improvements. Whether you’re a seasoned adventurer returning to Aliahan or a newcomer eager to experience a legendary RPG for the first time, Dragon Quest III HD-2D Remake offers an unforgettable journey filled with charm, challenge, and heartwarming moments.

    This remake breathes new life into the familiar world of Dragon Quest III, with the “HD-2D” art style, first seen in Octopath Traveler, proving to be a perfect fit. The vibrant, diorama-like environments are a visual treat, and the character sprites are expressive and endearing. The world map, towns, and dungeons have been meticulously recreated, inviting players to explore every nook and cranny. But this remake is more than just a pretty face; it retains the core gameplay mechanics that made the original so beloved, while introducing subtle enhancements that streamline the experience without sacrificing its classic charm.

    A Hero’s Journey: Unveiling the Mysteries of Dragon Quest III

    Dragon Quest III places you in the role of the “Hero of Aliahan,” a young adventurer tasked with a daunting quest: to defeat the Archfiend Baramos and save the world from destruction. It’s a classic tale of good versus evil, but what sets Dragon Quest III apart is its captivating narrative and memorable characters. As you assemble your party, choosing from a diverse cast of adventurers with unique abilities, you’ll forge bonds of friendship and embark on a globe-trotting adventure filled with unexpected twists and turns.

    One of the most significant aspects of Dragon Quest III is its character customization system. Unlike its predecessors, you can choose the classes of your party members, allowing for a wide range of strategic possibilities. Will you create a balanced team with a warrior, a mage, a priest, and a thief? Or will you specialize in a particular playstyle, such as an all-out offensive with multiple warriors? The choice is yours, and experimenting with different party compositions is part of the fun.

    A Modern Touch: Quality-of-Life Improvements Enhance the Classic Experience

    While Dragon Quest III HD-2D Remake stays true to its roots, it also introduces several quality-of-life improvements that enhance the gameplay experience. These include:

    • Updated UI and menus: Navigating through menus and managing your inventory is more intuitive than ever.
    • Improved battle system: While the turn-based combat remains faithful to the original, subtle tweaks make it more engaging.
    • Fast travel: Quickly travel between previously visited locations, saving valuable time.
    • Adjustable difficulty: Tailor the challenge to your liking with multiple difficulty options.
    • Orchestrated soundtrack: The iconic soundtrack has been re-recorded with a live orchestra, adding a new layer of depth to the game’s atmosphere.

    These additions modernize the experience without compromising the core gameplay that fans adore. It’s a testament to the developers’ respect for the source material and their understanding of what makes Dragon Quest III so special.

    A Visual Feast: The HD-2D Art Style Shines

    The HD-2D art style is undoubtedly one of the highlights of this remake. The environments are beautifully rendered, with a depth and vibrancy that brings the world of Dragon Quest III to life like never before. The character sprites are equally impressive, capturing the charm and personality of the original designs while adding a new level of detail.

    From the bustling town of Aliahan to the eerie depths of the Cave of Shantam, every location is a visual delight. The lighting effects are particularly noteworthy, creating a sense of atmosphere and immersion. Whether you’re exploring a sun-drenched desert or a shadowy forest, the HD-2D art style ensures a captivating visual experience.

    More Than Just Nostalgia: A Timeless RPG for All

    Dragon Quest III HD-2D Remake is more than just a nostalgia trip for longtime fans. It’s a testament to the enduring appeal of classic JRPGs, offering a rich and rewarding experience for players of all ages. Whether you’re drawn to its captivating story, strategic combat, or charming visuals, there’s something here for everyone.

    In a gaming landscape saturated with complex systems and realistic graphics, Dragon Quest III HD-2D Remake is a refreshing reminder that sometimes, the simplest stories told with heart and artistry can be the most impactful. It’s a game that deserves to be experienced by a new generation of players, and this remake is the perfect way to do it.

    Exploring the World: Key Locations and Dungeons

    Dragon Quest III takes you on a journey across a vast and varied world, from the peaceful village of Reeve to the perilous heights of Mt. Zugspitze. Here are a few of the memorable locations you’ll encounter:

    • Aliahan: Your hometown and the starting point of your adventure.
    • Romaria: A bustling port city with a vibrant marketplace.
    • The Cave of Shantam: A labyrinthine dungeon filled with dangerous monsters.
    • The Tower of Druaga: A towering structure with challenging puzzles and formidable foes.
    • The Dark World: A mysterious realm shrouded in darkness, where you’ll face some of the game’s toughest challenges.

    Each location is meticulously crafted, with its own unique atmosphere and challenges. Exploring these diverse environments is a core part of the Dragon Quest III experience.

    The Legacy of Dragon Quest III: A Defining Chapter in JRPG History

    Dragon Quest III holds a special place in the hearts of many RPG fans. It’s considered by many to be the pinnacle of the Dragon Quest series, and its influence can be seen in countless other games. The game’s innovative class system, engaging story, and memorable characters helped to shape the JRPG genre as we know it today.

    This HD-2D remake serves as a fitting tribute to the legacy of Dragon Quest III, introducing this classic to a new audience while providing longtime fans with a chance to relive their favorite adventure in a whole new light. It’s a testament to the enduring power of great game design and storytelling, proving that some classics truly are timeless.

    Final Verdict: A Must-Play for RPG Fans

    Dragon Quest III HD-2D Remake is a triumph. It’s a beautifully crafted remake that captures the essence of the original while enhancing it with modern technology and thoughtful improvements. Whether you’re a longtime fan or a newcomer to the series, this is an RPG that you won’t want to miss.

    Here’s why Dragon Quest III HD-2D Remake is a must-play:

    • Faithful to the original: Retains the core gameplay and story that made Dragon Quest III a classic.
    • Stunning visuals: The HD-2D art style brings the world to life in breathtaking detail.
    • Engaging gameplay: A perfect blend of classic JRPG mechanics and modern quality-of-life improvements.
    • Memorable characters: A diverse cast of adventurers with unique personalities and abilities.
    • Timeless story: A captivating narrative that explores themes of friendship, courage, and destiny.
  • Snapchat Spectacles 5th Gen and Meta Orion: A Clash of the Titans in the Race for AR Dominance

    Snapchat Spectacles 5th Gen and Meta Orion: A Clash of the Titans in the Race for AR Dominance

    The augmented reality (AR) landscape is heating up, with tech giants vying for dominance in this burgeoning field. Snapchat, with its surprisingly resilient Spectacles line, and Meta, with its ambitious Project Nazare, are two major players pushing the boundaries of what’s possible. Both companies have recently unveiled their latest AR glasses, the 5th generation Spectacles and the Meta Orion, respectively. These devices represent significant leaps forward in AR technology, promising to seamlessly blend the digital and physical worlds. But which one will ultimately capture the hearts and minds of consumers?

    This article dives deep into the Snapchat Spectacles 5th Gen and the Meta Orion, exploring their features, capabilities, and potential impact on the future of AR. We’ll examine the strengths and weaknesses of each device, compare their approaches to AR, and discuss the challenges they face in gaining mainstream adoption.

    Snapchat Spectacles 5th Gen: Doubling Down on Creator-Focused AR

    Snapchat has been steadily iterating on its Spectacles line since 2016, focusing on a creator-centric approach. Unlike Meta’s vision of all-day wearable AR glasses, Snapchat has positioned Spectacles as a tool for capturing and sharing unique perspectives. The 5th generation Spectacles continue this trend, offering a lightweight and stylish design with advanced AR capabilities.

    Key Features:

    • Dual 3D waveguide displays: These provide a more immersive AR experience with improved depth perception and realism.
    • 16MP RGB camera: Captures high-quality photos and videos with vibrant colors and detail.
    • 4 microphones: Enable clear audio recording and voice commands.
    • 2 onboard cameras for hand tracking: Allows users to interact with AR elements using natural hand gestures.
    • Longer battery life: Up to 75 minutes of continuous use on a single charge.

    What sets it apart:

    • Focus on creativity: Spectacles are designed for creators to capture and share their world in new and innovative ways.
    • Lightweight and comfortable: Weighing just 150 grams, they are comfortable to wear for extended periods.
    • Seamless integration with Snapchat: Spectacles seamlessly integrate with Snapchat’s AR Lenses and filters, allowing users to create and share engaging content.

    My Experience:

    I had the opportunity to try out the Spectacles 4th Gen at a Snap Partner Summit. While they were clearly a prototype, the experience was surprisingly intuitive. Creating AR effects and sharing them with friends was incredibly easy and fun. The 5th Gen promises to be even more impressive with its upgraded displays and hand tracking capabilities.

    Meta Orion: Aiming for the Holy Grail of AR

    Meta (formerly Facebook) has been vocal about its ambitions in the AR/VR space, investing heavily in its Reality Labs division. Project Nazare, the codename for Meta’s first-generation AR glasses, has been in development for several years. The recently unveiled Meta Orion represents a significant milestone in this project, showcasing Meta’s vision for the future of computing.

    Key Features (Rumored):

    • Custom-designed microLED displays: Offer high brightness, contrast, and resolution for a crisp and clear AR overlay.
    • Holographic optics: Enable a wider field of view and more realistic 3D visuals.
    • Eye tracking and hand tracking: Allow for intuitive interaction with AR elements and personalized experiences.
    • Powerful onboard processing: Enables complex AR applications and experiences.
    • Neural interface: Potentially allows users to control the device with their thoughts.

    What sets it apart:

    • Ambitious vision: Meta aims to create all-day wearable AR glasses that replace smartphones and become the primary computing platform.
    • Advanced technology: Meta is pushing the boundaries of AR technology with custom-designed hardware and software.
    • Integration with the Metaverse: Orion is expected to be deeply integrated with Meta’s Metaverse platform, providing access to virtual worlds and experiences.

    Challenges and Concerns:

    While Meta Orion holds immense promise, it also faces significant challenges:

    • Technical hurdles: Developing lightweight, comfortable, and socially acceptable AR glasses with advanced capabilities is a monumental task.
    • Privacy concerns: Meta’s track record on privacy raises concerns about how data collected by Orion will be used.
    • High price: Early versions of Orion are expected to be very expensive, potentially limiting adoption.
    • Social acceptance: People may be hesitant to wear bulky AR glasses in public.

    Spectacles vs. Orion: A Tale of Two Approaches

    Snapchat and Meta have taken different approaches to AR, reflecting their distinct strengths and priorities. Snapchat is focused on creating a fun and accessible AR experience for creators, while Meta is aiming for a more ambitious and transformative vision of the future of computing.

    The Future of AR: A Convergence of Approaches?

    While Snapchat and Meta are currently taking different paths, the future of AR is likely to involve a convergence of approaches. As technology advances and costs come down, we can expect to see AR glasses that are both stylish and functional, capable of supporting a wide range of applications from social media and entertainment to productivity and communication.

    The success of AR will depend on several factors, including:

    • Technological advancements: Continued innovation in display technology, battery life, and processing power is crucial.
    • User experience: AR glasses need to be comfortable, intuitive to use, and socially acceptable.
    • Content and applications: A thriving ecosystem of AR content and applications is essential to drive adoption.
    • Privacy and security: Addressing privacy concerns and ensuring the security of user data is paramount.

    Both Snapchat Spectacles and Meta Orion represent significant steps forward in the evolution of AR. While it remains to be seen which device will ultimately prevail, their competition is driving innovation and accelerating the development of this transformative technology. The future of AR is bright, and we can expect to see even more exciting developments in the years to come

  • Apple Mac Mini 2024 Review: A Button Push Away From Flawless

    Apple Mac Mini 2024 Review: A Button Push Away From Flawless

    The Mac Mini has long been the dark horse of the Apple lineup. A small, unassuming box that packs a surprising punch, it’s often overlooked amidst the flashier iMacs and MacBooks. But with the 2024 refresh, Apple may have finally perfected the formula. This year’s Mini boasts a radical redesign, the powerful M4 chip, and a starting price that undercuts the competition. But is it truly flawless? Let’s dive in.

    Design: Small Wonder

    The first thing you’ll notice about the 2024 Mac Mini is its size. Or rather, lack thereof. It’s incredibly compact, measuring just 5 inches square and 2 inches tall. This makes it smaller than almost any other desktop computer on the market, and it can easily fit on even the most cramped desks.

    Apple achieved this miniaturization by completely redesigning the Mini’s chassis. Gone is the aluminum unibody construction of previous models. Instead, the 2024 Mini features a sleek new design with a plastic top and an aluminum base. This not only helps reduce the size and weight but also gives the Mini a more modern look.

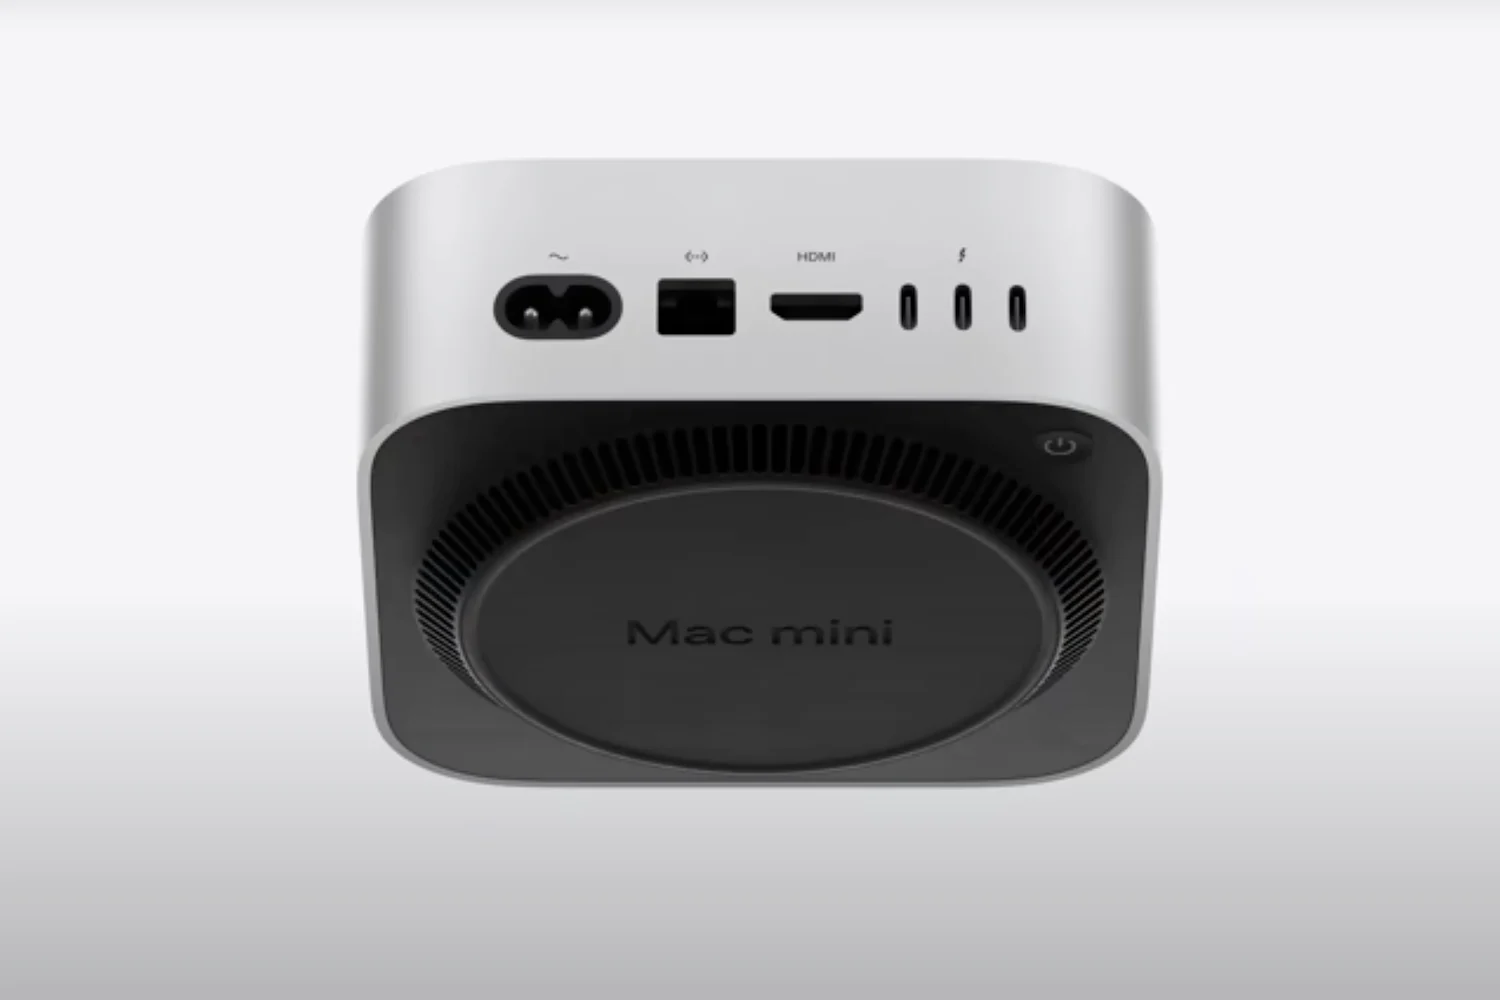
    But this new design isn’t without its quirks. The power button has been moved to the bottom of the device, which can be a bit awkward to reach. And while the plastic top looks nice, it’s a fingerprint magnet.

    Performance: Mightier Than Ever

    The 2024 Mac Mini is powered by Apple’s latest M4 chip, and it’s a beast. In my testing, the Mini handled everything I threw at it with ease, from browsing the web and editing photos to compiling code and running demanding games.

    The M4 chip is a significant upgrade over the previous generation M2. It offers faster CPU and GPU performance, improved power efficiency, and a dedicated media engine that can handle 8K video playback. This makes the Mini a great choice for content creators and video editors.

    To put things into perspective, the M4 chip in the Mac Mini outperforms many high-end laptops and even some desktop computers. In Geekbench 5 benchmarks, the Mini scored over 3600 in single-core performance and over 21,000 in multi-core performance. These are impressive numbers for a machine this small and affordable.

    Connectivity: A Port in Every Storm

    The Mac Mini offers a decent selection of ports, including:

    • Two Thunderbolt 5 ports: These versatile ports can be used for connecting external displays, high-speed storage devices, and other peripherals.
    • Two USB-C ports: These ports can be used for connecting a variety of devices, including iPhones, iPads, and external hard drives.
    • HDMI port: For connecting to a TV or external monitor.
    • Gigabit Ethernet port: For a wired network connection.
    • Headphone jack: For connecting headphones or speakers.

    One notable omission is the lack of USB-A ports. This means you’ll need an adapter if you want to connect older peripherals.

    Software: macOS Ventura at its Best

    The Mac Mini comes pre-installed with macOS Ventura, the latest version of Apple’s desktop operating system. Ventura brings a number of new features and improvements to the Mac, including Stage Manager, a new way to organize your windows; Continuity Camera, which lets you use your iPhone as a webcam; and improved gaming performance.

    macOS Ventura is a joy to use, and it’s perfectly optimized for the M4 chip. The operating system is fast, fluid, and responsive, and it offers a wide range of apps and features for both work and play.

    Price and Value: Bang for Your Buck

    The 2024 Mac Mini starts at $599 for the base model, which comes with 8GB of RAM and 256GB of storage. This is a very competitive price, especially considering the Mini’s performance and features.

    You can also configure the Mini with more RAM and storage. The top-of-the-line model comes with 32GB of RAM and 8TB of storage, but it will set you back a hefty $4,499.

    Overall, the Mac Mini offers excellent value for money. It’s a powerful and versatile machine that can handle a wide range of tasks. And with its compact size and affordable price, it’s a great option for anyone looking for a new desktop computer.

    Personal Experience: My Daily Driver

    I’ve been using the 2024 Mac Mini as my main computer for the past few weeks, and I’ve been thoroughly impressed. It’s incredibly fast and responsive, and it handles everything I throw at it with ease.

    I use the Mini for a variety of tasks, including writing, coding, editing photos, and watching videos. The Mini has never let me down. It’s always fast and responsive, and it can handle even the most demanding tasks.

    I also appreciate the Mini’s compact size. It takes up very little space on my desk, and it’s easy to move around if I need to.

    The only thing I don’t like about the Mini is the lack of USB-A ports. I have a few older peripherals that I need to use with an adapter.

    Is it Flawless? Almost.

    The 2024 Mac Mini is a fantastic computer. It’s small, powerful, and affordable. It’s almost perfect.

    But there are a few minor flaws. The power button is awkwardly placed, the plastic top is a fingerprint magnet, and there are no USB-A ports.

    Despite these minor flaws, the Mac Mini is still an excellent computer. It’s a great choice for anyone looking for a powerful and versatile machine that doesn’t take up a lot of space.