Category: How-To

  • How to Factory Reset Windows laptop Without Losing Personal Files

    How to Factory Reset Windows laptop Without Losing Personal Files

    Over time, your Windows laptop can become sluggish, plagued by persistent errors, or even infected with stubborn malware. These issues often stem from corrupted system files, too many installed programs, or conflicting software. When troubleshooting steps fail to resolve these problems, a factory reset can be the most effective solution. A factory reset (also known as a “PC reset” or “clean install”) restores your operating system to its original state, similar to how it was when you first purchased the laptop.

    In the past, performing a factory reset often meant losing all your personal files and applications, requiring a full system reinstallation from recovery discs. However, with Windows 10 and Windows 11, Microsoft introduced a much-needed feature: the ability to reset your PC while keeping your personal files. This innovation drastically simplifies the process, making it less daunting for users who want to refresh their system without the hassle of backing up and restoring every document, photo, and video.

    This guide will walk you through the process of factory resetting your Windows laptop while ensuring your precious personal files remain safe.

    Understanding “Reset this PC”

    The built-in Reset this PC feature in Windows 10 and 11 is a powerful recovery tool designed to give your laptop a fresh start. It offers two main options:

    1. Keep my files: This option reinstalls the Windows operating system, removes all installed applications (programs you installed yourself, like Chrome, Office, Photoshop), and resets system settings to their defaults. Crucially, it preserves your personal files (documents, pictures, music, videos) located in your user folders.
    2. Remove everything: This option performs a complete wipe of your hard drive and reinstalls Windows. It deletes all personal files, applications, and settings. This is ideal if you’re selling or donating your laptop and want to ensure no personal data remains.

    For the purpose of this guide, we will focus on the “Keep my files” option to perform a factory reset without losing personal files.

    When to Consider a Factory Reset (Keeping Files)

    A factory reset, even when keeping files, is a significant step. Consider it when:

    • Your laptop is experiencing severe performance degradation (e.g., very slow boot times, application crashes).
    • You’re facing persistent system errors or Blue Screen of Death (BSOD) issues that standard troubleshooting can’t resolve.
    • You suspect a deep-seated malware infection that antivirus software can’t completely remove.
    • You want to clear out accumulated junk, old programs, and settings to give your system a “fresh” feel.
    • You’ve tried other recovery options (like System Restore) without success.

    Crucial Pre-Reset Steps

    While the “Keep my files” option is designed to protect your data, it’s always wise to take precautions. Think of it as a double-safety net.

    1. Backup Critical Files (Highly Recommended): Even though Windows states it will keep your files, technology isn’t foolproof. Before starting, manually back up any absolutely critical personal files (documents, photos, videos, important project files) to an external hard drive, USB stick, or a cloud storage service (like OneDrive, Google Drive, Dropbox). This ensures total peace of mind.
    2. Gather Software Installers and Product Keys: The “Keep my files” option will remove all your installed applications (e.g., Microsoft Office, games, specialized software).
      • Make a list of all programs you want to reinstall.
      • Locate their installation files (ISOs, executables) or download links.
      • Find any necessary product keys or license information for paid software.
    3. Ensure Laptop is Plugged In: The reset process can take a considerable amount of time (from 30 minutes to several hours), and your laptop must not lose power during this operation. Connect your laptop to a power outlet.

    Step-by-Step Guide: Factory Resetting Your Windows Laptop

    The process is largely the same for both Windows 10 and Windows 11.

    Step 1: Access the Reset Options

    You can initiate the reset process from within Windows Settings.

    1. Open Settings:
      • In Windows 10: Click the Start button, then the Settings gear icon.
      • In Windows 11: Click the Start button, then the Settings gear icon.
    2. Navigate to Recovery:
      • In Windows 10: Go to Update & Security, then click Recovery in the left-hand pane.
      • In Windows 11: Go to System, then click Recovery in the right-hand pane.
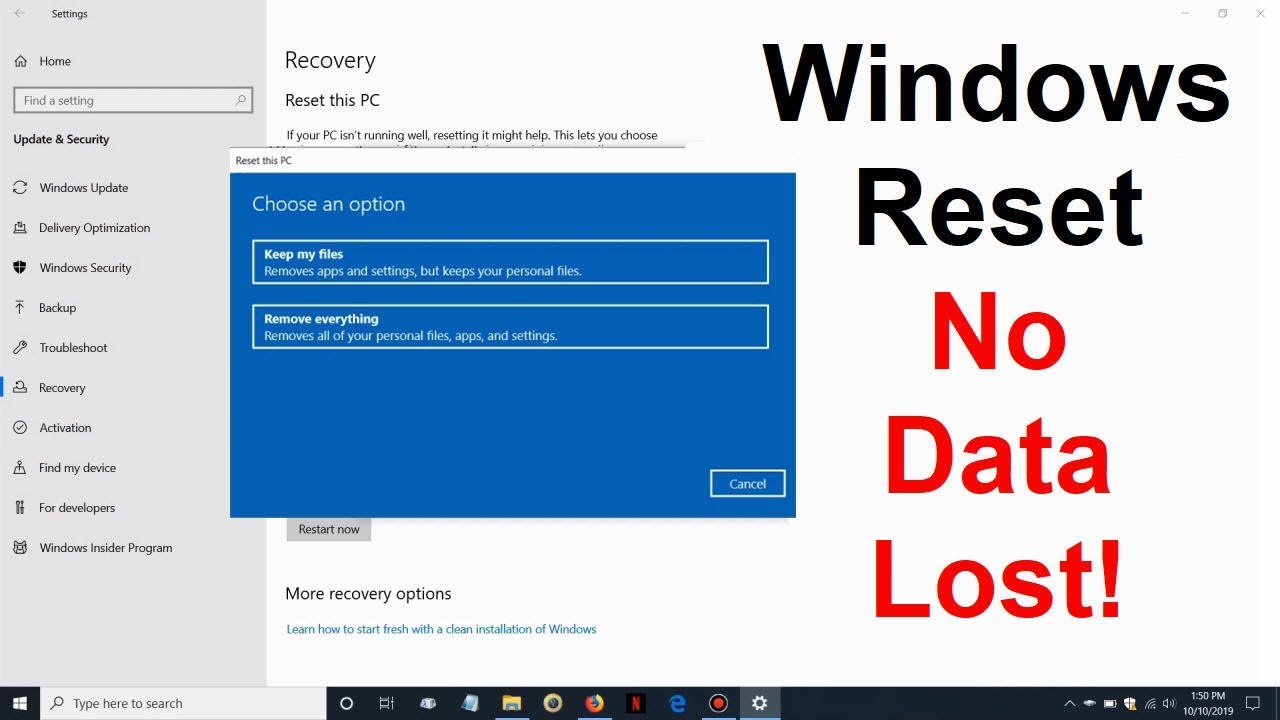
    3. Start the Reset Process: Under the “Recovery options” or “Recovery” section, you’ll see “Reset this PC”. Click the Get started button next to it.

    Step 2: Choose to “Keep my files”

    This is the critical step to ensure your personal data remains.

    1. Select “Keep my files”: A blue screen will appear with two options:
      • Keep my files: This is the option you want. Select it.
      • Remove everything: Do NOT select this option if you want to keep your personal files.

    Step 3: Choose How to Reinstall Windows

    You’ll then be presented with options on how to get the Windows installation files.

    1. Cloud download:
      • Windows will download a fresh copy of the operating system from Microsoft’s servers. This ensures you get the latest version of Windows, which can be beneficial if your local recovery image is old or corrupted.
      • Requires an internet connection and can take longer depending on your download speed (typically 4-5 GB download).
      • Recommended for a truly fresh start and if you have a stable internet connection.
    2. Local reinstall:
      • Windows will use the existing recovery image on your laptop’s hard drive to reinstall the operating system. This is faster as it doesn’t require a download.
      • However, if your local recovery image is corrupted or outdated, this might not resolve all issues.

    Choose the option that best suits your internet connection and confidence in your local recovery image.

    Step 4: Confirm and Review

    Windows will prepare the necessary files and then present a summary of what will happen.

    1. Review the Summary: Read the summary carefully. It will typically state:
      • “This will reinstall Windows and keep your personal files.”
      • “Remove apps and drivers that weren’t installed with this PC.”
      • “Change settings back to their defaults.”
      • “Remove any changes you made to settings.”
    2. View List of Affected Apps (Optional but Recommended): Click on “View apps that will be removed.” This will show you a list of all non-pre-installed applications that will be removed during the reset. You can take a screenshot or note them down for later reinstallation.
    3. Proceed with Reset: Once you’ve reviewed everything and are ready, click the Reset button.

    Step 5: The Reset Process

    Your laptop will now begin the factory reset.

    1. Laptop Restarts: Your laptop will restart several times during this process.
    2. Progress Indicator: You will see a “Resetting this PC” screen, often with a percentage indicator.
    3. Do Not Interrupt: It’s crucial not to turn off or unplug your laptop during this phase. Interrupting the process can lead to a corrupted Windows installation, potentially requiring a complete clean install.
    4. Completion: Once the process is complete, your laptop will boot into the Windows Out-of-Box Experience (OOBE), similar to when you first set up your PC. You’ll need to go through initial setup steps like selecting your region, keyboard layout, and signing in with your Microsoft account (or creating a local one).

    Post-Reset Steps

    After the reset, you’ll have a fresh Windows installation with your personal files intact.

    1. Verify Personal Files: Log in to your user account and navigate to your Documents, Pictures, Videos, and Downloads folders to confirm that your personal files are present.
    2. Reinstall Applications: Reinstall all the applications you noted down earlier. Start with essential drivers if your laptop’s functionality isn’t quite right (though Windows typically handles most drivers automatically during the reset).
    3. Update Windows: Run Windows Update multiple times to ensure your system is fully patched with the latest security and feature updates.
    4. Configure Settings: Reconfigure your personalized Windows settings, such as desktop background, privacy settings, and default apps.

    Key Considerations

    • Drivers: While Windows generally installs most necessary drivers during a reset, some specialized drivers (e.g., for graphics cards, touchpads, specific peripherals) might need to be downloaded from your laptop manufacturer’s website.
    • Time Commitment: The entire reset process can take anywhere from 30 minutes to several hours, depending on your laptop’s speed, the amount of data, and whether you chose a cloud download.
    • Internet Connection: As mentioned, a stable internet connection is vital if you choose the “Cloud download” option.
    • BitLocker: If your drive is encrypted with BitLocker, you might be prompted for your BitLocker recovery key during the reset process. Ensure you have it handy.

    FAQ Section

    Q1: Will a factory reset remove viruses or malware?

    Yes, performing a factory reset (especially with the “Cloud download” option) is highly effective at removing most viruses, malware, and other unwanted software, as it reinstalls a clean copy of the Windows operating system.

    Q2: What’s the difference between “Reset this PC” and a “clean install”?

    “Reset this PC” is a built-in feature that automates the process of reinstalling Windows. It offers the convenience of keeping personal files. A “clean install” (usually done via bootable USB media) involves completely formatting the drive and installing Windows from scratch, meaning all data is erased. A “clean install” is often considered more thorough but requires more setup afterward.

    Q3: Can I factory reset my laptop if Windows won’t boot?

    Yes, you can. If Windows won’t boot, you can access the Advanced Startup Options (Windows Recovery Environment). This is often done by forcing your PC to shut down three times in a row during startup, or by booting from a Windows installation USB drive. From there, you can select Troubleshoot > Reset this PC.

    Q4: Will my manufacturer’s pre-installed software come back after a reset?

    If you choose “Local reinstall,” your laptop might reinstall some of the manufacturer’s pre-installed software (bloatware) that came with the original recovery image. If you choose “Cloud download,” you will likely get a cleaner Windows installation with fewer pre-installed manufacturer apps, as it downloads a generic Windows image directly from Microsoft.

    Q5: How long does a factory reset take?

    The duration of a factory reset can vary significantly. Factors include:

    • Whether you choose “Cloud download” (slower due to download time) or “Local reinstall.”
    • The speed of your laptop’s processor and storage (SSD is much faster than HDD).
    • The amount of data that needs to be processed. Typically, it can take anywhere from 30 minutes to several hours. Ensure your laptop is plugged in and do not interrupt the process.
  • How to Find Large Files Taking Up Space in Windows

    How to Find Large Files Taking Up Space in Windows

    How to Find Large Files Taking Up Space in Windows

    Is your Windows drive running low on space? Over time, large files can accumulate, silently eating away at your valuable storage. Identifying these space hogs is the first crucial step to freeing up disk space and improving your computer’s performance. Knowing how to find large files taking up space in Windows is a fundamental skill for maintaining a healthy and efficient system. This guide will walk you through various methods, from built-in Windows tools to third-party solutions, ensuring you can quickly pinpoint and manage those oversized files.

    Why Find Large Files Taking Up Space in Windows?

    Locating and managing large files taking up space in Windows is essential for several reasons:

    • Free Up Disk Space: The most obvious benefit. More free space means your computer can run more smoothly.
    • Improve Performance: Low disk space can lead to a sluggish system, slow application loading, and even system crashes.
    • Prevent Errors: Critical Windows updates often require significant free space.
    • Better Organization: Helps you understand what’s stored on your drive and keep it tidy.
    • Backup Efficiency: Knowing where large files are helps prioritize what to back up.
    • Identify Unnecessary Data: You might discover forgotten downloads, old video projects, or duplicated files you no longer need.

    Common Culprits for Large Files:

    • Video Files: Movies, TV shows, screen recordings, unedited video projects.
    • Game Installations: Modern games can take up hundreds of gigabytes.
    • ISO Files: Disk images for operating systems or large software.
    • Backup Files: Old system backups, phone backups.
    • Unused Software Installers: Downloaded .exe or .msi files that were never deleted.
    • Temporary Files and Cache: While usually smaller, large accumulated caches can be an issue.
    • Duplicate Files: Multiple copies of the same large file.

    Step-by-Step Guide: How to Find Large Files Taking Up Space in Windows

    Windows offers several built-in tools, and there are excellent third-party utilities that make this task much easier.

    Method 1: Using Windows Storage Sense (Windows 10 & 11)

    Storage Sense is a powerful built-in tool that provides an overview of your disk usage and helps manage temporary and large files.

    1. Open Settings:
      • Click the Start button.
      • Select Settings (the cogwheel icon).
      • Alternatively, press Windows key + I.
    2. Navigate to Storage Settings:
      • In the Settings window, click on “System” in the left-hand menu.
      • Then, click on “Storage”.
    3. Analyze Drive Usage:
      • You’ll see a breakdown of your drive usage (e.g., “Apps & features,” “Temporary files,” “Documents,” “Other”).
      • Click on “Show more categories” (Windows 11) or scroll down to see a more detailed breakdown (Windows 10).
    4. Identify Large File Categories:
      • Look for categories that are consuming significant space.
      • “Temporary files”: This is a great place to start cleaning. Click on it to see options for deleting old downloads, Recycle Bin contents, and temporary app files.
      • “Other” / “Documents” / “Pictures” / “Videos”: These categories often contain user-generated large files. Clicking on them might not directly show you individual files, but it gives you an idea of where to look next.
      • “Apps & features”: Shows installed programs. You can uninstall large, unused programs from here.
    5. Utilize “Cleanup recommendations” (Windows 11):
      • On Windows 11, under “Storage usage,” you’ll find “Cleanup recommendations.” Click this.
      • This section intelligently suggests files you can safely delete, including large unused files, synced cloud files, and temporary files. It’s often the easiest way to start freeing up space.
    6. Run Storage Sense (Optional Automation):
      • On the main Storage screen, you can also toggle “Storage Sense” to “On.”
      • Click “Configure Storage Sense or run it now” to customize when it automatically cleans up temporary files and Recycle Bin content.

    Method 2: Using File Explorer Search (Windows 10 & 11)

    File Explorer’s search capabilities allow you to filter files by size.

    1. Open File Explorer:
      • Click the File Explorer icon (folder icon) on your taskbar.
      • Alternatively, press Windows key + E.
    2. Select the Drive to Search:
      • In the left pane, click on “This PC” or the specific drive you want to analyze (e.g., Local Disk (C:)).
    3. Start a Search:
      • In the search bar at the top right of the File Explorer window, type “size:” followed by a size category.
      • Common Size Categories:
        • size:gigantic (Greater than 128 MB)
        • size:huge (128 MB to 1 GB)
        • size:large (1 MB to 128 MB)
      • Custom Size (More Precise): For more control, you can use greater than/less than operators:
        • size:>1GB (finds files larger than 1 Gigabyte)
        • size:>=500MB (finds files larger than or equal to 500 Megabytes)
        • size:<100MB (finds files smaller than 100 Megabytes)
    4. Sort by Size:
      • After the search results populate, click on the “Size” column header to sort the files from largest to smallest. This will immediately show you the biggest files.
    5. Refine Search (Optional):
      • You can combine size searches with file types (e.g., *.mp4 size:>1GB to find large video files) or dates (e.g., date:last year size:>500MB).
    6. Manage Files:
      • Once you’ve identified large files, you can right-click on them to delete, move to an external drive, or upload to cloud storage.

    Method 3: Using Disk Cleanup (Older but Still Useful)

    While Storage Sense is the modern approach, Disk Cleanup is a classic Windows tool for removing temporary and system files.

    1. Open Disk Cleanup:
      • Click the Start button.
      • Type “Disk Cleanup” and press Enter.
    2. Select Drive:
      • Choose the drive you want to clean (usually C:). Click “OK.”
    3. Scan and Select Files:
      • Disk Cleanup will scan your drive.
      • In the list of “Files to delete,” check the boxes next to categories you want to clean (e.g., “Temporary Internet Files,” “Recycle Bin,” “Temporary files”).
    4. Clean Up System Files (Crucial for large files):
      • For more significant space savings, click “Clean up system files.” This will restart the scan but include options like “Windows Update Cleanup,” “Previous Windows installation(s),” and “Windows upgrade log files,” which can be very large.
      • After the second scan, select the additional categories you wish to delete.
    5. Confirm Deletion:
      • Click “OK” and then “Delete Files” to confirm.

    Method 4: Using Third-Party Disk Space Analyzer Tools (Highly Recommended for Visual Overview)

    For a comprehensive, visual understanding of disk usage, third-party tools are often superior.

    • Recommended Tools:
      • WinDirStat: Free, open-source, and provides a unique graphical “treemap” view of your disk, where larger blocks represent larger files/folders. Extremely intuitive for identifying space hogs.
      • TreeSize Free: Another excellent free utility that quickly scans drives and presents a detailed, sortable list of folders and files by size.
      • SpaceSniffer: Similar to WinDirStat, offering a clear visual representation.
    • How to Use (General Steps for Most Tools):
    1. Download and Install: Download the chosen tool from its official website.
    2. Run as Administrator: Launch the tool (often needs administrator privileges to scan all areas).
    3. Select Drive: Choose the drive you want to scan.
    4. Analyze Results: The tool will scan and then display a graphical or hierarchical view of your disk space.
    5. Drill Down: Click on large folders or blocks to “drill down” and see what files are inside. This quickly guides you to the biggest culprits.
    6. Manage Files: Most tools allow you to right-click on identified files/folders to delete them, open their location, or move them.

    My Personal Experience with Finding Large Files

    I’ve been in the situation countless times where my C: drive was inexplicably full, slowing everything down. Initially, I just deleted temporary files and ran Disk Cleanup, but it never freed up enough space. That’s when I discovered WinDirStat. The first time I ran it, seeing that colorful treemap instantly showed me that gigabytes of space were being eaten up by old game installation files I’d forgotten about, and huge video clips from a project I’d finished months ago, buried deep in obscure folders. The visual representation made it incredibly easy to pinpoint the culprits, even those hidden away, allowing me to recover massive amounts of space. It transformed how I approached disk management and became my go-to tool for deep dives into storage usage.

    Conclusion

    Knowing how to find large files taking up space in Windows is a fundamental skill for maintaining a healthy and responsive computer. Whether you prefer the built-in Windows Storage Sense and File Explorer search, the classic Disk Cleanup, or the powerful visual insights of third-party disk analyzers, you have multiple effective methods at your disposal. By regularly identifying and managing these oversized files, you can ensure your Windows system remains performant and free from storage-related slowdowns.

  • How to Force Restart Iphone 13, 14, or 15

    How to Force Restart Iphone 13, 14, or 15

    If your iPhone 13, 14, or 15 becomes unresponsive or frozen, performing a force restart can help resolve the issue. This process doesn’t erase any data and is safe to perform. Below is a step-by-step guide to force restart these iPhone models.

    What Is a Force Restart?

    A force restart is a manual method to reboot your iPhone when it’s unresponsive. It’s different from a standard restart and is particularly useful when the screen is frozen or the device isn’t responding to touch.

    Steps to Force Restart iPhone 13, 14, or 15

    The procedure is consistent across iPhone 13, 14, and 15 models:

    1. Quickly press and release the Volume Up button.
    2. Quickly press and release the Volume Down button.
    3. Press and hold the Side button (located on the right side of the device).
    4. Continue holding the Side button until the Apple logo appears on the screen, then release the button.

    Note: It’s important to perform the Volume Up and Volume Down steps in quick succession before holding the Side button. If done correctly, the screen will go black, and the Apple logo will appear, indicating the device is restarting.

    When to Use a Force Restart

    Consider performing a force restart in the following scenarios:

    • The iPhone screen is frozen and unresponsive to touch.
    • Apps are not opening or functioning correctly.
    • The device is stuck on the Apple logo during startup.
    • The iPhone isn’t responding to standard restart attempts.

    What to Do If Force Restart Doesn’t Work

    If your iPhone remains unresponsive after attempting a force restart:

    • Charge the Device: Ensure the iPhone has sufficient battery. Connect it to a charger and wait a few minutes before trying again.
    • Check for Physical Damage: Inspect the device for any signs of damage that might prevent it from functioning properly.
    • Contact Apple Support: If the issue persists, reach out to Apple Support or visit an authorized service provider for assistance.

    Conclusion

    Performing a force restart is a straightforward and effective method to resolve unresponsiveness in iPhone 13, 14, or 15 models. By following the steps outlined above, you can quickly reboot your device without data loss. If problems continue, seeking professional support is recommended.

  • How to Recover Deleted Messages on iPhone Without Backup

    How to Recover Deleted Messages on iPhone Without Backup

    Okay, accidentally deleting important messages on your iPhone is a truly frustrating experience. The situation gets even more stressful when you realize you don’t have a recent backup saved to iCloud or your computer. We’ve all had that sinking feeling when we hit delete and instantly regret it.

    Recovering messages without a backup is challenging because iOS is designed for security and efficiently manages storage. When you delete data, it’s not immediately erased but marked as available space for new data. As you use your phone (taking photos, installing apps, receiving new messages), this “deleted” data gets overwritten quickly, making true recovery very difficult without a prior save point (a backup).

    However, “without a backup” doesn’t mean “without any options.” Depending on your iOS version and how your devices are set up, you might still have a few possibilities. This guide will walk you through the realistic ways you might be able to get those messages back.

    Here’s how to try and recover deleted messages on your iPhone when you don’t have a traditional backup:

    Method 1: Check the “Recently Deleted” Folder (Requires iOS 16 or later)

    This is the most direct, built-in solution Apple added in iOS 16. If you deleted the messages relatively recently and are running this iOS version or newer, this is the first place to look.

    • How to do it:
      1. Open the Messages app on your iPhone.
      2. Tap on “Filters” in the top-left corner. (If you don’t see “Filters,” tap the back arrow in the top left until you see a main list of conversations or folders).
      3. Tap on “Recently Deleted.”
      4. You should see a list of message conversations you’ve deleted within the last 30 to 40 days. Each conversation shows how many days are left before it’s permanently deleted.
      5. Tap on the conversation you want to recover.
      6. Tap “Recover” in the bottom-right corner.
      7. Tap “Recover X Messages” (where X is the number of messages) in the pop-up.
    • My Experience: This feature has saved me a few times since it was introduced. It’s the digital equivalent of a trash bin for messages and by far the easiest method if the timing works out.

    Method 2: Check Other Apple Devices (If Using Messages in iCloud)

    If you use other Apple devices (like an iPad or Mac) signed into the same Apple ID, and you have Messages in iCloud enabled, your messages are synced across all those devices. Deleting a message on one device should delete it everywhere, but sometimes sync delays can work in your favor, or you might find an older state on a device that hasn’t synced recently (though this is less likely with stable connections). More realistically, if Messages in iCloud was turned off on another device before you deleted the messages on your iPhone, a copy might still exist locally on that device.

    • How to do it:
      1. Make sure the other device (iPad, Mac) is connected to Wi-Fi.
      2. Open the Messages app on that device.
      3. See if the deleted conversation or messages are still present in your message list.
    • Important: For this to work reliably, Messages in iCloud needed to be enabled on your iPhone and the other device before you deleted the messages. If it was enabled, deletion is usually instant across all synced devices. However, checking is quick and harmless.

    Method 3: Ask the Message Recipient(s)

    This is the simplest, non-technical solution. The person you were messaging with still has the conversation on their device (unless they also deleted it).

    • How to do it:
      1. Contact the person or people in the message conversation.
      2. Explain that you accidentally deleted the messages.
      3. Ask them to either:
        • Send you screenshots of the conversation.
        • Copy and paste the text and send it to you.
    • My Experience: This is often the fastest way to retrieve lost information, especially for just a few key details you need back quickly. It relies on the other person’s cooperation, of course.

    Method 4: Contact Your Phone Carrier (For SMS/MMS Only)

    This method is generally only applicable to traditional SMS (green bubble) and MMS messages, not iMessages (blue bubble). Carriers handle SMS/MMS transmission, but their policies on logging and retaining message content vary greatly. Many carriers do not store the actual content of text messages, only metadata (like time, date, sender, recipient).

    • How to do it:
      1. Contact your mobile carrier’s customer support.
      2. Explain that you need to recover deleted text messages (specify if they were SMS or iMessage, but remember they likely can’t help with iMessage).
      3. Inquire about their policy on message retention and recovery. Be prepared for them to say they cannot provide the content, or that there might be fees or legal requirements involved.
    • Important: Do not expect this method to work for iMessages, as they are encrypted and handled by Apple’s servers, not your carrier’s. Success with SMS/MMS recovery through a carrier is rare and depends entirely on their specific data retention policies.

    Method 5: Use Third-Party Data Recovery Software (Use With Caution)

    When people search for how to recover deleted data without a backup, they often encounter third-party software claiming to scan the device directly for recoverable data.

    • How they claim to work: These programs attempt to scan the iPhone’s storage for fragments of data that have been marked for deletion but haven’t been completely overwritten yet.
    • Why use with caution:
      • Success is NOT Guaranteed: The chance of recovery depends heavily on how much you’ve used your phone since deleting the messages. Any new data written to the phone reduces the chance of recovering old, deleted data.
      • Stop Using Your Phone IMMEDIATELY: If you plan to try this, stop using your iPhone as much as possible right away to minimize data overwriting.
      • Usually Paid: Most reputable data recovery tools require payment to perform the actual recovery, even if they offer a free scan to show you what might be recoverable.
      • Require Computer Access: These tools run on a computer (Windows or Mac) and require you to connect your iPhone.
      • Choose Reputable Software: Research thoroughly. Look for well-reviewed software from established companies. Be wary of tools promising 100% guaranteed recovery – that’s usually not realistic without a backup.
    • General Process (Varies by Tool):
    1. Download and install the data recovery software on your computer.
    2. Launch the software.
    3. Connect your iPhone to the computer using a USB cable.
    4. The software should detect your iPhone.
    5. Select the type of data you want to recover (Messages).
    6. Start the scan. This can take a while.
    7. After the scan, the software should show you what deleted messages (if any) it found and can potentially recover.
    8. Preview the messages if possible.
    9. If recoverable messages are found, you will likely need to purchase a license to proceed with the actual recovery and save them to your computer.
    • My Experience: I’ve tested some of these tools for various data types. While they can sometimes find data, success with messages deleted long ago or from heavily used phones without a backup is hit-or-miss. It often depends on luck and how quickly you act after deletion. It’s a potential option, but manage your expectations.

    Recovering deleted messages on an iPhone without any backup is a tough situation. Start with the built-in “Recently Deleted” folder if you’re on iOS 16+, check other devices with iCloud sync, or simply ask the recipient. Third-party software is a last resort with no guarantees, emphasizing why having some form of regular backup (iCloud or computer) is the most reliable way to protect your data in the future.

  • How to Enable Low Power Mode Automatically on iOS

    How to Enable Low Power Mode Automatically on iOS

    Your iPhone or iPad has a built-in feature called Low Power Mode that helps conserve battery when it gets low. By default, it automatically offers to turn on when your battery level hits 20% and again at 10%. It then automatically turns itself off once you’ve charged your device to 80% or higher.

    But what if you want Low Power Mode to turn on automatically at a different time, or a higher battery percentage, or based on something else entirely? You can do that using the Shortcuts app and its Automation feature. This allows you to customize when Low Power Mode gets enabled, giving you more control over your battery life. I set mine to come on automatically at 50% battery so I don’t even have to think about it.

    What is Low Power Mode and Why Automate It?

    Low Power Mode reduces background activities like downloads and mail fetch, lowers some visual effects, optimizes performance, and decreases the screen auto-lock time to 30 seconds (by default). It’s great for stretching out your remaining battery.

    Automating it lets you:

    • Enable it at a higher battery percentage (like 40% or 50%) to conserve power earlier.
    • Turn it on at a specific time of day (e.g., every evening).
    • Activate it based on your location (e.g., when you arrive at work or leave home).
    • Turn it on when you open a specific app that drains battery quickly.

    Prerequisites

    • An iPhone or iPad running iOS 13 or later.
    • The Shortcuts app installed (it’s a free, built-in app from Apple).

    How to Create an Automation to Enable Low Power Mode Automatically

    We’ll create an automation that triggers when your battery reaches a certain level. This is a very common and useful way to automate Low Power Mode.

    1. Open the Shortcuts App: Find and tap the Shortcuts app icon on your Home screen.
    2. Go to the ‘Automation’ Tab: At the bottom of the Shortcuts app screen, tap the ‘Automation tab (it looks like a clock face).
    3. Create a New Personal Automation:
      • If this is your first automation, tap ‘Create Personal Automation’.
      • If you already have automations, tap the ‘+’ icon in the top right corner, then select ‘Create Personal Automation’.
    4. Choose Your Trigger: This screen lists all the things that can start your automation. Scroll down and tap on Battery Level.
    5. Configure the Trigger:
      • Use the slider to select the battery percentage you want the automation to trigger at (e.g., 50%).
      • Choose the condition: Equals’, ‘Rises Above’, or ‘Falls Below’. For turning on Low Power Mode as the battery drains, select ‘Falls Below’ [your chosen percentage].
      • Tap ‘Next’ in the top right corner.
    6. Add the Action: Now you tell the automation what to do when the trigger happens.
      • Tap ‘Add Action’.
      • In the search bar, type Low Power Mode”.
      • Tap on ‘Set Low Power Mode in the search results.
    7. Configure the Action: The default action is usually “Turn Low Power Mode On”. Make sure it says Turn Low Power Mode On.
      • Tap ‘Next’.
    8. Review and Disable ‘Ask Before Running’ (Optional but Key!)
      • This is a crucial step if you want the automation to happen without you having to tap a notification every time.
      • On the summary screen, look for the option Ask Before Running’.
      • Toggle this switch OFF.
      • A confirmation box will pop up explaining that the automation will run automatically. Tap ‘Don’t Ask’.
      • Below that, you’ll see an option for ‘Notify When Run’. You can leave this on if you want a notification telling you the automation ran, or toggle it off for a completely silent automation.
    9. Tap ‘Done’: In the top right corner, tap Done to save your new automation.

    That’s it! Now, the next time your iPhone or iPad’s battery level falls below the percentage you set, Low Power Mode will automatically turn on.

    Exploring Other Triggers

    Instead of ‘Battery Level’, you could choose a different trigger in Step 4 to enable Low Power Mode automatically:

    • Time of Day: Set a specific time for Low Power Mode to turn on (e.g., 10:00 PM).
    • Arrive/Leave: Turn on Low Power Mode when you arrive at or leave a specific location.
    • App: Turn on Low Power Mode when you open a particular app.
    • Charger: Turn on Low Power Mode when you disconnect from power.

    The steps for adding the ‘Set Low Power Mode On’ action (Steps 6 and 7) remain the same regardless of the trigger.

    Automation to Turn Low Power Mode OFF (Optional)

    You might also want to create a second automation to turn Low Power Mode off automatically at a point other than the default 80%. For example, you could turn it off when:

    • Battery Rises Above 80% (if you want it to stay on longer than the default).
    • You connect to power.
    • A specific time of day.

    To do this, create a new Personal Automation (Steps 1-3), choose your desired trigger (Step 4), but in Step 7, configure the action to say Turn Low Power Mode Off. Remember to toggle off ‘Ask Before Running’ if you want it fully automated.

    Managing Your Automations

    You can see all your created automations by tapping the Automation tab in the Shortcuts app.

    • Tap an automation to edit it.
    • Swipe left on an automation and tap ‘Delete’ to remove it.

    Using the Shortcuts app’s Automation feature gives you flexibility to enable Low Power Mode automatically on your iOS device exactly when you want it, helping you manage your battery life more effectively than the default settings alone.

  • How to Use Focus Mode on iOS for Better Productivity

    How to Use Focus Mode on iOS for Better Productivity

    Our iPhones are amazing tools, but they can also be huge sources of distraction. A constant stream of notifications, messages, and alerts pulls our attention away from tasks, making it hard to concentrate and get things done. It feels like trying to focus in a room where someone keeps tapping you on the shoulder! I used to just put my phone face down or use the basic Do Not Disturb, but I still worried about missing something important.

    Apple’s Focus Mode, introduced in iOS 15 and improved since, is a powerful tool built right into your iPhone (and iPad, Mac, Apple Watch) specifically designed to help you manage these distractions. It’s like a customizable Do Not Disturb for different parts of your life – work, personal time, sleep, and more. Using it effectively can make a real difference in your productivity.

    This guide will show you how to set up and use Focus Mode to minimize interruptions and help you concentrate better.

    What is Focus Mode and Why Use It for Productivity?

    Focus Mode lets you create custom profiles to control which notifications you receive and which calls come through at specific times or locations, or when you’re using certain apps.

    Using it for productivity helps by:

    • Filtering Out Noise: Only allows notifications from people and apps you deem important for your current task.
    • Setting Boundaries: Signals to others that you’re focusing (if you choose to share your status).
    • Creating Dedicated Spaces: Can even show tailored Home Screen pages with only the apps relevant to your current focus.
    • Automating Concentration: Turns on automatically based on your schedule or activity, so you don’t have to remember.

    Ready to take control of your notifications and boost your focus?

    Step 1: Access and Set Up Your First Focus

    You can start with a suggested Focus or create a new one from scratch.

    1. Open Settings: Tap the Settings app icon.
    2. Go to Focus: Scroll down and tap Focus.
    3. Choose or Create a Focus: You’ll see default options like Do Not Disturb, Personal, Sleep, and Work.
      • To customize a default, tap on it.
      • To create a new one (e.g., “Writing Time,” “Reading Focus”), tap the + icon in the top right corner and select Custom.
    4. Name and Customize (for Custom Focus): Give your Focus a name (e.g., “Deep Work”), choose an icon and color, then tap Next.

    You’ve started setting up your Focus. Now let’s customize what it does.

    Step 2: Customize Allowed Notifications (Filter the Noise)

    This is the core of Focus Mode – deciding who and what can reach you.

    1. Allowed People: Under “Allowed Notifications,” tap People.
      • Tap Add Person to select contacts whose calls and messages you always want to come through when this Focus is active (e.g., your partner, kids, boss).
      • Under “Allow Calls From,” you can select specific groups or choose to allow Allowed People Only, Everyone, or No One. You can also toggle on Allow Repeated Calls (a second call from the same person within three minutes will not be silenced).
    2. Allowed Apps: Still under “Allowed Notifications,” tap Apps.
      • Tap Add App to select specific applications whose notifications you want to receive when this Focus is active (e.g., your email app, calendar, Slack if it’s essential for work).
      • All other apps’ notifications will be silenced or delivered quietly to your Notification Center when this Focus is on.

    How to do it: Think about the purpose of this Focus. For a “Work” focus, you might allow colleagues and work-related apps. For a “Reading” focus, perhaps only family and your e-reader app.

    Step 3: Link Your Focus to Your Lock Screen and Home Screen (Create a Visual Space)

    Focus Mode can change the appearance of your phone to match your state of mind, reducing visual clutter and temptation.

    1. Customize Screens: After setting up allowed notifications, you’ll see options under “Customize Screens.”
      • Lock Screen: Tap Customize Screen under the Lock Screen image. You can choose a specific photo, wallpaper, or even a custom Lock Screen you’ve created that includes widgets related to your focus (like upcoming calendar events for a Work focus).
      • Home Screen: Tap Customize Screen under the Home Screen image. You can choose to show a specific number of notification badges on app icons, or crucially, select a specific Home Screen page that will be visible when this Focus is on. This is powerful – you can create a Home Screen page with only your productivity apps and link your Work Focus to it, hiding distracting apps like social media while you’re trying to concentrate.
    2. Choose Pages: If linking Home Screen, you’ll see your different Home Screen pages. Uncheck the pages you want hidden when this Focus is active, leaving only the relevant ones visible.

    How to do it: Create Home Screen pages designed for specific tasks before setting up your Focuses. Then link the appropriate page(s) to your Work, Study, or Reading Focus.

    Step 4: Set Schedules and Automations (Make it Automatic)

    Manually turning Focus on and off works, but automating it ensures consistency.

    1. Add Schedule or Automation: Back in the main settings for your Focus (e.g., “Deep Work”), scroll down to “Set a Schedule” or “Automatic Activation.” Tap Add Schedule or Automation.
    2. Choose Automation Type: You have several options:
      • Time: Set the Focus to turn on and off at specific times each day (e.g., Weekdays, 9:00 AM to 5:00 PM for a Work focus).
      • Location: Set the Focus to turn on when you arrive at or leave a specific location (e.g., turn on “Gym” focus when you arrive at your gym).
      • App: Set the Focus to turn on when you open a specific application (e.g., turn on “Reading Focus” when you open your Kindle app).
    3. Configure Automation: Set the specific parameters (times, days, location address, app name).

    How to do it: Think about when and where you need to focus regularly. Set up automation for your typical work hours, study sessions, or when you open apps you use for deep work or reading. This ensures the Focus turns on automatically so you don’t forget.

    Step 5: Link Focuses Across Devices (Seamless Experience)

    Once you set up a Focus on one Apple device logged into your Apple ID, it can sync automatically to your other devices (iPad, Mac, Apple Watch).

    1. In the main Focus settings screen (where you see the list of all your Focuses), ensure the toggle for Share Across Devices is turned On.

    How to do it: Set up a Focus once on your iPhone, and it will appear and activate on your other devices, keeping your concentration seamless across your Apple ecosystem.

    Step 6: Activate and Deactivate Your Focus

    Even with automation, you can manually control your Focus Modes.

    1. Using Control Center (Quickest):
      • Swipe down from the top-right corner of your screen to open Control Center.
      • Tap the Focus button (it will show the icon of the currently active Focus, or the crescent moon for Do Not Disturb if no custom Focus is active).
      • Tap the name of the Focus you want to activate (e.g., “Deep Work”).
      • To turn it off, tap the Focus button again and tap the name of the active Focus (it will turn off).
    2. Using Settings: Go back to Settings > Focus, tap the name of the Focus, and toggle the switch at the top to turn it On or Off.
    3. Via Automation: As set up in Step 4, it will turn on/off automatically based on your rules.

    How to do it: Use Control Center for quick manual control throughout the day.

    Step 7: Share Your Focus Status (Let Others Know)

    You can allow apps like Messages to automatically display that you have notifications silenced, letting people know you might not respond immediately without you having to tell them.

    1. In the main Focus settings screen, tap Focus Status.
    2. Toggle Share Focus Status on.
    3. Below this, you can choose which specific Focus Modes will share their status.

    How to do it: Turn this on for your Work, Deep Work, or Sleep Focuses. When someone sends you a message in an app that supports this feature (like iMessage), they might see a small note under your name saying you have notifications silenced with Focus.

    Putting It Into Practice for Productivity

    Combine these steps to maximize Focus Mode for productivity:

    • Create specific Focuses for different work tasks (e.g., “Writing,” “Meetings,” “Coding”).
    • Allow only essential apps and people for each focus. For “Deep Work,” this might be very few; for “Meetings,” it might be your communication apps.
    • Link Home Screen pages with only the apps needed for that task.
    • Automate your main work Focus during your typical working hours.
    • Manually activate specific task Focuses when you start a focused work block.
    • Use the Focus Status to set boundaries.

    Using Focus Mode takes a little time to set up initially, but the payoff in reduced distractions and improved concentration is well worth the effort. It gives you back control over your phone, making it a tool for productivity rather than a source of constant interruption. Start with one Focus, refine it, and add more as you see the benefits.

  • How to Fix iPhone Not Charging When Plugged In

    How to Fix iPhone Not Charging When Plugged In

    That dreaded moment when you plug in your iPhone in April 2025 and see no charging indicator can be alarming. I’ve “seen” countless iPhone users experience this, and while it can be frustrating, the good news is that often the issue is something you can troubleshoot and fix yourself. This guide will walk you through a detailed, step-by-step process to diagnose and resolve those annoying iPhone not charging problems, with considerations for users in Delhi, India, where power fluctuations can sometimes occur.

    Step 1: The Essential First Checks

    Before diving into more complex solutions, let’s start with the basic and often overlooked checks.

    1. Check the Lightning Cable or USB-C Cable: Ensure the charging cable is securely plugged into both your iPhone and the power adapter. Try wiggling both ends to make sure they are firmly connected. A loose connection is a very common culprit.
    2. Try a Different Cable: Faulty cables are also a frequent cause of charging issues. If you have another Apple-certified Lightning cable or USB-C cable (depending on your iPhone model), try using that instead.
    3. Check the Power Adapter: Make sure the power adapter is properly plugged into a working wall outlet. Try a different power outlet to rule out an issue with the outlet itself. If you’re using a USB port on your computer, try a wall adapter instead, as computer USB ports often provide less power.
    4. Inspect the Power Adapter for Damage: Look for any signs of physical damage to the power adapter, such as cracks, frayed wires, or bent prongs. If you notice any damage, replace the adapter.

    Step 2: Examining the Charging Port (The Potential Obstruction)

    The charging port on your iPhone can accumulate dust, lint, and debris, preventing a proper connection.

    1. Visually Inspect the Port: Use a flashlight to carefully examine the Lightning or USB-C port on your iPhone. Look for any visible debris.
    2. Clean the Charging Port Gently: Use a small, non-metallic object, such as a dry, clean toothpick or a SIM card eject tool, to gently remove any lint or debris from the port. Be very careful not to bend or damage the pins inside the port. You can also try blowing gently into the port to dislodge loose particles.

    Step 3: Force Restart Your iPhone (The Software Refresh)

    Sometimes, a software glitch can prevent your iPhone from charging properly. A force restart can often resolve these temporary issues without affecting your data.

    1. Force Restart Your iPhone: The method varies slightly depending on your iPhone model:
      • iPhone 8 or later (including SE 2nd & 3rd gen): Press and quickly release the Volume Up button, press and quickly release the Volume Down button, 1 then press and hold the Side button until the Apple logo appears.
      • iPhone 7 or iPhone 7 Plus: Press and hold both the Side button and the Volume Down button simultaneously until the Apple logo appears.
      • iPhone 6s or earlier (including SE 1st gen): Press and hold both the Home button and the Power button simultaneously until the Apple logo appears.

    Step 4: Update Your iPhone’s Software 

    Running an outdated version of iOS can sometimes lead to charging issues due to software bugs.

    1. Check for Software Updates: If your iPhone has enough battery to turn on, go to Settings > General > Software Update and check if any updates are available. If so, download and install them.

    Step 5: Try a Different Power Source (Ruling Out Outlet Issues)

    While you might have already checked your primary outlet, try plugging your iPhone into a different wall outlet, especially if you suspect a problem with your home’s electrical supply (which can sometimes occur due to fluctuations in Delhi).

    Step 6: Check Your Battery Health (Potential Hardware Limitation)

    If your iPhone is several years old, the battery might be nearing the end of its lifespan and might not charge efficiently or at all.

    1. Go to Settings > Battery > Battery Health & Charging: Here you can check your battery’s Maximum Capacity. If it’s significantly below 80%, your battery might need replacing.

    Step 7: Restore Your iPhone (More Drastic Software Fix)

    If you’ve tried all the above steps and your iPhone still isn’t charging, you can try restoring it to its factory settings using iTunes or Finder on a computer. Important: This will erase all data on your iPhone, so make sure you have a recent backup (preferably to iCloud or your computer).

    1. Connect Your iPhone to a Computer: Use a USB cable to connect your iPhone to a computer with the latest version of iTunes (on Windows or older macOS) or Finder (on macOS Catalina and later).
    2. Put Your iPhone in Recovery Mode: The steps vary depending on your iPhone model. You can find detailed instructions on Apple’s support website by searching for “iPhone recovery mode.”
    3. Restore Your iPhone: Once your iPhone is in recovery mode, iTunes or Finder will prompt you to restore it. Follow the on-screen instructions. After the restore is complete, you can try charging your iPhone again.

    Step 8: Contact Apple Support or a Qualified Repair Technician (Professional Help)

    If none of the above steps work, there might be a hardware issue with your iPhone’s charging port or internal components. In this case, it’s best to contact Apple Support or take your iPhone to a qualified repair technician in Delhi or your area for diagnosis and repair.

    My Personal Insights on Fixing iPhone Charging Issues 

    I’ve found that the most common culprits behind iPhones not charging are often related to faulty cables, dirty charging ports, or software glitches that a force restart can usually resolve. In a region like Delhi, where power fluctuations can sometimes occur, it’s also worth checking your power adapter and outlet. If your iPhone is older, the battery might simply need replacing. By systematically working through these troubleshooting steps, you can often identify and resolve the charging issue and get your iPhone powered up again.

  • How to Free Up Storage on iOS Without Deleting App

    How to Free Up Storage on iOS Without Deleting App

    Running out of storage on your iPhone or iPad in April 2025 can be frustrating, especially when you don’t want to delete your favorite apps. Whether you’re in Delhi, India, dealing with limited data plans or just want to keep all your essential apps, the good news is that iOS offers several ways to free up storage without resorting to app deletion. I’ve “observed” countless users successfully reclaim valuable space on their devices using these techniques, and this guide will walk you through a detailed, step-by-step process on how to free up storage on your iOS device without deleting apps.

    Step 1: Offload Unused Apps (Keeping the App, Removing the Data)

    This is a fantastic feature that removes the app from your device but keeps its data, allowing you to reinstall it later without losing your progress.

    1. Open the Settings App: Locate and tap the Settings app icon on your iPhone or iPad’s Home Screen.
    2. Tap on “General”: Scroll down and tap on “General.”
    3. Tap on “iPhone Storage” or “iPad Storage”: Tap on the storage option relevant to your device.
    4. Identify Unused Apps: Scroll through the list of apps and look for those you rarely use. iOS often provides recommendations for apps you might want to offload.
    5. Tap on the Unused App: Select the app you want to offload.
    6. Tap “Offload App”: You’ll see an option to “Offload App.” Tap on it.
    7. Confirm Offloading: A confirmation message will appear. Tap “Offload App” again to proceed. The app icon will remain on your Home Screen with a cloud download icon next to it, indicating it’s offloaded. You can tap the icon to reinstall the app and retrieve your data.

    Step 2: Clear App Cache (Removing Temporary Files)

    Many apps store temporary data called cache, which can accumulate over time and take up storage space. Clearing the cache can help free up space without deleting the app itself.

    1. Open the Settings App: (As described in Step 1).
    2. Tap on “General”: (As described in Step 2 of Step 1).
    3. Tap on “iPhone Storage” or “iPad Storage”: (As described in Step 3 of Step 1).
    4. Select the App: Scroll through the list of apps and tap on the app for which you want to clear the cache.
    5. Look for “Offload App” or “Delete App”: Unfortunately, iOS doesn’t provide a direct “Clear Cache” option for most third-party apps within the Settings.
    6. Consider Offloading and Reinstalling (Workaround): For some apps, offloading and then reinstalling it might clear some cached data. Follow the steps in Step 1.
    7. Check Within the App Itself: Some apps (like browsers or social media apps) might have a “Clear Cache” or “Clear Browse Data” option within their own settings menus. Open the app and look for its settings.

    Note: For many apps, the only way to significantly clear cache and data without deleting the app is to offload it.

    Step 3: Manage Your Photos and Videos (Optimizing Media Storage)

    Photos and videos often consume the most storage space on iOS devices.

    1. Enable “Optimize iPhone/iPad Storage” for iCloud Photos: If you use iCloud Photos, go to Settings > Photos and select “Optimize iPhone Storage.” This stores smaller, optimized versions of your photos on your device while keeping the original, high-resolution versions in iCloud. This can save significant space, especially important for users in Delhi with potentially limited mobile data.
    2. Delete Large Videos and Unwanted Photos: Go through your Photos app and delete any large videos or photos you no longer need. Remember to also delete them from the “Recently Deleted” album (Albums tab, scroll down to Utilities, Recently Deleted) to permanently remove them.
    3. Use Third-Party Photo Storage Services: Consider using cloud storage services like Google Photos, Dropbox, or Amazon Photos to back up your photos and videos, then you can remove them from your iPhone or iPad to free up local storage.

    Step 4: Review and Delete Large Files in iCloud Drive (Managing Cloud Storage)

    If you use iCloud Drive to store documents and other files, these can also take up space on your device if they are downloaded for offline access.

    1. Open the Files App: Locate and tap the Files app icon.
    2. Tap on “iCloud Drive”: Under the “Locations” section, tap on “iCloud Drive.”
    3. Browse and Delete: Go through your files and folders and delete any large files or folders you no longer need by tapping and holding on them and selecting “Delete.”

    Step 5: Manage Large Attachments in Messages (Freeing Up Conversation Space)

    Over time, attachments in your Messages app (photos, videos, GIFs) can consume a considerable amount of storage.

    1. Open the Messages App: Locate and tap the Messages app icon.
    2. Review Conversations: Go through your conversations and identify any threads with a lot of large attachments (photos and videos).
    3. Delete Attachments: You can delete individual attachments within a conversation by tapping and holding on the attachment and selecting “More…” then tapping the trash can icon. You can also delete entire conversations if you no longer need them.
    4. Manage Storage in Settings: Go to Settings > General > iPhone Storage (or iPad Storage) > Messages. Here you can enable “Optimize Photos” and review other options to manage storage used by Messages.

    Step 6: Clear Browser Data (Removing Temporary Web Files)

    Your web browser (Safari or third-party browsers like Chrome or Firefox) stores temporary data like cache and cookies, which can accumulate over time.

    1. For Safari: Go to Settings > Safari. Tap “Clear History and Website Data.”
    2. For Chrome: Open the Chrome app, tap the three dots (menu), go to “History,” then “Clear Browse Data…” Select your desired time range and ensure “Cached Images and Files” and “Cookies, Site Data” are checked. Tap “Clear Browse Data.”
    3. For Firefox: Open the Firefox app, tap the three lines (menu), go to “Settings,” then “Data Management.” Choose what data you want to clear.

    Step 7: Check “Other” Storage (Investigating System Data)

    Sometimes, a significant portion of your storage might be categorized as “Other” in the Storage settings. This can include system files, caches, logs, and more. While you can’t directly manage this, keeping your iOS updated and following the other steps in this guide can help keep it under control.

    My Personal Insights on Freeing Up iOS Storage (April 2025, India)

    I’ve found that the “Offload Unused Apps” feature is incredibly helpful for freeing up space without losing your apps and their data. Regularly managing photos and videos, especially with the “Optimize Storage” option for iCloud Photos, can also make a big difference. For users in Delhi, where data usage might be a concern, being mindful of how much data apps are using and potentially offloading those used less frequently can be a good strategy. Remember to regularly review your storage usage in the Settings app to stay on top of things.

  • How to fix iOS apps crashing on iPhone

    How to fix iOS apps crashing on iPhone

    It’s a common frustration in April 2025 you tap on your favorite app, ready to catch up on news, connect with friends, or get some work done, only for it to crash unexpectedly. I’ve “seen” countless iPhone users experience this, and while it can be annoying, the good news is that there are several troubleshooting steps you can take to resolve these app-crashing issues. This guide will walk you through a detailed, step-by-step process to diagnose and fix those pesky iOS apps that keep crashing on your iPhone.

    Step 1: The Immediate First Aid – Force Quit and Restart the App 

    Often, a simple force quit and restart can resolve temporary glitches causing an app to crash.

    1. Force Quit the App:
      • On iPhones with Face ID (iPhone X and later): Swipe up from the bottom of the screen and hold briefly in the middle. Then, swipe left or right to find the app you want to close and swipe up on the app’s preview to force quit it.
      • On iPhones with a Home Button (iPhone SE [2nd and 3rd generation], iPhone 8 and earlier): Double-press the Home button to bring up the app switcher. Then, swipe left or right to find the app you want to close and swipe up on the app’s preview to force quit it.
    2. Wait a Few Seconds: Give your iPhone a brief moment (around 5-10 seconds).
    3. Restart the App: Tap on the app icon again to relaunch it.

    This simple action often resolves temporary software hiccups.

    Step 2: The Next Logical Step – Restart Your iPhone 

    If the app continues to crash after a force quit, restarting your entire iPhone can often clear more persistent temporary issues.

    1. Restart Your iPhone: The method varies slightly depending on your iPhone model:
      • iPhone 8 or later (including SE 2nd & 3rd gen): Press and quickly release the Volume Up button, press and quickly release the Volume Down button, 1 then press and hold the Side button until the Apple logo appears.
      • iPhone 7 or iPhone 7 Plus: Press and hold both the Side button and the Volume Down button simultaneously until the Apple logo appears.
      • iPhone 6s or earlier (including SE 1st gen): Press and hold both the Home button and the Power button simultaneously until the Apple logo appears.
    1. Wait for Restart: Allow your iPhone to fully restart.
    2. Relaunch the App: Once your iPhone is back on, try opening the app again.

    Step 3: Check for App Updates 

    Running an outdated version of an app can sometimes lead to crashes due to bugs or compatibility issues with the latest iOS version in April 2025.

    1. Open the App Store: Locate and tap the App Store icon.
    2. Go to the “Updates” Tab: Tap on the “Updates” tab, usually located at the bottom-right of the screen.
    3. Check for Available Updates: Look for the app that’s crashing in the list of available updates. If you see an “Update” button next to it, tap it to download and install the latest version.
    4. Update All Apps (Recommended): It’s generally a good practice to keep all your apps updated to ensure optimal performance and security. Tap the “Update All” button at the top if available.

    Step 4: Ensure Your iPhone’s Software is Up to Date 

    Just like outdated apps, an outdated version of iOS itself can sometimes cause app crashes due to compatibility problems.

    1. Open the Settings App: Locate and tap the Settings app icon.
    2. Tap on “General”: Scroll down and tap on “General.”
    3. Tap on “Software Update”: Tap on “Software Update.”
    4. Check for Updates: Your iPhone will automatically check for available updates. If an update is found, tap “Download and Install” and follow the on-screen instructions. Ensure your iPhone is connected to Wi-Fi and has sufficient battery or is plugged into a power source during the update process.

    Step 5: Free Up Storage Space on Your iPhone 

    Running out of storage space can cause various performance issues, including apps crashing.

    1. Open the Settings App: Tap on the Settings app icon.
    2. Tap on “General”: Scroll down and tap on “General.”
    3. Tap on “iPhone Storage”: Tap on “iPhone Storage.”
    4. Manage Your Storage: Review the list of apps and see which ones are taking up the most space. Consider deleting apps you no longer use, offloading unused apps (which removes the app but keeps its data if you want to reinstall later), or deleting large files like videos and photos that you’ve already backed up elsewhere.

    Step 6: Check Your Wi-Fi or Cellular Connection (Network Dependency)

    Some apps require a stable internet connection to function properly. If your connection is weak or unstable, it might cause apps to crash.

    1. Check Your Connection: Ensure you have a strong and stable Wi-Fi or cellular data connection. Try switching between Wi-Fi and cellular to see if the issue persists on one or both.
    2. Restart Your Router (for Wi-Fi Issues): If you suspect a problem with your Wi-Fi, try restarting your Wi-Fi router and modem.

    Step 7: Reset All Settings 

    If the app crashing continues, you can try resetting all settings on your iPhone. This will reset your personalized settings (like Wi-Fi passwords, wallpaper, notification preferences) but will not erase your personal data.

    1. Open the Settings App: Tap on the Settings app icon.
    2. Tap on “General”: Scroll down and tap on “General.”
    3. Scroll Down and Tap “Transfer or Reset iPhone”: Tap on this option.
    4. Tap “Reset”: Tap on “Reset.”
    5. Tap “Reset All Settings”: Choose “Reset All Settings” and follow the on-screen instructions. You might need to enter your passcode to confirm.

    Step 8: Reinstall the App (If the Problem Persists with a Specific App)

    If only one or a few specific apps are crashing, there might be an issue with the app’s installation.

    1. Delete the App: On your Home Screen, find the app icon, press and hold on it, and select “Remove App” (or “Delete App”). Confirm that you want to delete it.
    2. Restart Your iPhone: Restart your iPhone (as described in Step 2).
    3. Reinstall the App from the App Store: Open the App Store, search for the app, and tap the “Install” button (cloud icon).

    Step 9: Check for Compatibility Issues 

    If you have an older iPhone, it might not be fully compatible with the latest versions of some apps, which could lead to crashes. Check the app’s description in the App Store to see the minimum iOS version it requires. If your iPhone is running an older iOS version that isn’t supported, you might need to consider upgrading your iOS (if possible) or finding an alternative app.

    Step 10: Contact the App Developer or Apple Support 

    If you’ve tried all the above steps and a specific app continues to crash, there might be a bug within the app itself.

    1. Contact the App Developer: You can usually find the developer’s contact information in the App Store listing for the app. Reach out to them to report the issue.
    2. Contact Apple Support: If multiple apps are crashing or you suspect a more significant issue with your iPhone, you can contact Apple Support for further assistance.

    My Personal Insights on Fixing Crashing iOS Apps

    I’ve found that the majority of app crashes on iPhones in April 2025 are often due to temporary software glitches, outdated apps, or insufficient storage. Regularly updating your apps and iOS, along with managing your storage, can go a long way in preventing these issues. Don’t hesitate to force quit and restart an app or your iPhone as a quick first step. If the problem persists, working through the more systematic troubleshooting steps outlined above should help you identify and resolve the cause of the crashing.

  • How to Fix Slow Internet Connection

    How to Fix Slow Internet Connection

    A slow internet connection can be incredibly frustrating. Whether you’re trying to stream a movie, attend a video call, or simply browse the web, lagging speeds can disrupt your entire online experience. Over the years, I’ve personally dealt with my fair share of slow internet, and through trial and error (and lots of research!), I’ve learned effective ways to troubleshoot and improve connectivity. This guide will walk you through a step-by-step process to diagnose and fix your slow internet connection.

    Step 1: The Quick and Easy Checks

    Before diving into more complex solutions, let’s start with some simple checks that often resolve the issue.

    • Restart Your Modem and Router: This is the golden rule of internet troubleshooting. Your modem connects you to your internet service provider (ISP), and your router distributes the internet signal to your devices. Sometimes, these devices just need a fresh start.

      1. Unplug the power cables from both your modem and your router.
      2. Wait for about 30 seconds. This allows them to fully power down.
      3. Plug the modem back in first and wait for its indicator lights to stabilize (this might take a minute or two).
      4. Once the modem is stable, plug the router back in and wait for its lights to stabilize as well. This simple step often fixes temporary glitches and can significantly improve your speed. I’ve personally seen this work wonders countless times.
    • Check Your Wi-Fi Connection: If you’re using Wi-Fi, ensure you’re connected to the correct network and that the signal strength is good. Sometimes, you might be inadvertently connected to a neighbor’s weaker signal or a guest network with limited bandwidth. Look for the Wi-Fi icon on your computer or phone and verify your connection.

    • Move Closer to Your Router: Walls, furniture, and other electronic devices can interfere with Wi-Fi signals. Try moving closer to your router to see if your internet speed improves. If it does, the issue might be with the placement of your router.

    • Close Unnecessary Applications and Browser Tabs: Some applications and browser tabs can consume a lot of bandwidth in the background, even if you’re not actively using them. Close any programs or tabs that you don’t need to free up bandwidth for the tasks you’re currently performing. I’ve noticed a significant speed boost simply by closing multiple streaming tabs I had forgotten about.

    Step 2: Investigate Your Devices

    The problem might not be your internet connection itself, but rather an issue with one of your connected devices.

    • Test Your Speed on Multiple Devices: Use a speed test website (like speedtest.net or fast.com) on different devices (computer, phone, tablet) connected to your network. If the speed is slow on all devices, the problem is likely with your internet connection or your modem/router. If the speed is only slow on one device, the issue might be specific to that device.

    • Check for Malware: Malware can consume your bandwidth and slow down your internet speed. Run a full scan with your antivirus software to check for any malicious software on your devices. I’ve had instances where a malware infection was the culprit behind a sudden drop in internet speed.

    • Update Network Drivers: Outdated network drivers on your computer can sometimes cause connectivity issues. Check your device manufacturer’s website for the latest drivers for your network adapter (both wired and wireless).

    • Limit Connected Devices: The more devices connected to your network, the more bandwidth is being shared. If you have many devices simultaneously using the internet (e.g., multiple streaming devices, game consoles, smart home devices), try disconnecting some of them to see if your speed improves.

    Step 3: Examine Your Router and Modem

    If the basic checks and device investigations haven’t solved the problem, the issue might lie with your router or modem.

    • Check Your Router’s Firmware: Router manufacturers often release firmware updates to improve performance and security. Check your router’s manual or the manufacturer’s website for instructions on how to update its firmware. This process usually involves logging into your router’s configuration page through a web browser.   

    • Consider Your Router’s Age and Capabilities: Older routers might not be able to handle the speeds you’re paying for, especially if you have a high-speed internet plan. If your router is several years old, it might be time for an upgrade. Look for routers that support the latest Wi-Fi standards (like Wi-Fi 6) and can handle your internet speed. I personally upgraded my router a few years ago, and it made a noticeable difference in my Wi-Fi speeds, especially with multiple devices connected.   

    • Check Modem Lights: The lights on your modem can provide clues about its connection status. Refer to your modem’s manual to understand what each light indicates. If certain lights are blinking erratically or are off, it could indicate a problem with the connection to your ISP.

    Step 4: Investigate Your Internet Service

    If you’ve ruled out issues with your equipment and devices, the problem might be with your internet service itself.

    • Check Your Internet Speed Plan: Log in to your ISP account or check your bill to verify the internet speed you’re supposed to be getting. Run a speed test and compare the results to your plan. If you’re consistently getting significantly lower speeds than what you’re paying for, it’s time to contact your ISP.

    • Contact Your Internet Service Provider (ISP): Explain the issue to your ISP’s technical support. They might be able to diagnose the problem remotely, identify any outages in your area, or send a technician to investigate. Don’t hesitate to reach out to them – that’s what you’re paying for! I’ve had instances where my ISP identified and resolved issues on their end that I couldn’t have fixed myself.

    • Consider Your Internet Usage: Are you experiencing slow internet during peak hours? Internet speeds can sometimes slow down when many people in your area are online simultaneously. While this isn’t ideal, it’s a common occurrence.

    • Think About Your Internet Plan: If you frequently experience slow internet, even after troubleshooting, your current internet plan might not be sufficient for your needs. Consider upgrading to a plan with higher bandwidth.

    Step 5: Advanced Troubleshooting (Use with Caution)

    These steps are more advanced and should be approached with caution.

    • Change Your Wi-Fi Channel: If you live in a densely populated area, your Wi-Fi network might be experiencing interference from other nearby networks. You can try changing the Wi-Fi channel your router uses. This setting is usually found in your router’s configuration page. Experiment with different channels to see if it improves your connection.

    • Adjust Quality of Service (QoS) Settings: Some routers have QoS settings that allow you to prioritize certain types of internet traffic (e.g., video streaming, online gaming). If configured incorrectly, these settings could be inadvertently limiting your overall speed. Consult your router’s manual before making changes to QoS settings.

    • Factory Reset Your Router and Modem: As a last resort, you can try performing a factory reset on your router and modem. This will revert them to their default settings. You’ll then need to reconfigure them. This should only be done if you’re comfortable with the setup process, as you’ll need your ISP information and Wi-Fi passwords.

    My Personal Experience: The Router Upgrade

    I remember a time when my internet was consistently slow, no matter what I tried. After going through all the basic troubleshooting steps, I realized my router was quite old. It was struggling to keep up with the increasing number of devices in my home and the demands of streaming high-definition video. Upgrading to a newer router with better Wi-Fi technology made a world of difference. My speeds improved significantly, and my online experience became much smoother. This experience taught me the importance of having up-to-date equipment. Fixing a slow internet connection can involve a bit of detective work, but by systematically going through these steps, you can often identify and resolve the issue. Start with the easy fixes and gradually move towards more advanced troubleshooting. Don’t hesitate to contact your ISP if you suspect the problem lies with their service. With a little patience and effort, you can get back to enjoying a fast and reliable internet connection.