A restore point is like a snapshot of your Windows system’s critical files and settings at a specific moment in time. If your computer starts experiencing problems after installing a new program, driver, or Windows update, you can use a restore point to roll back your system to that earlier, stable state. This can often fix issues without requiring a complete reinstallation of Windows. While Windows sometimes creates restore points automatically, knowing how to manually create a restore point before making significant changes is a fundamental skill for any user.
Understanding System Restore and Restore Points
System Restore is a Windows recovery feature that helps you fix common system problems by reverting your computer to a previous state. It specifically affects:
- System Files: Core operating system files.
- Installed Programs: Applications you’ve installed since the restore point was created will be uninstalled.
- Windows Registry: The database that stores configuration settings for the operating system and applications.
- System Settings: Various Windows settings.
What System Restore DOES NOT affect:
- Personal Files: Your documents, pictures, music, videos, and other personal data stored in your user folders (like My Documents, My Pictures) are not deleted or changed by System Restore.
- Antivirus Definitions: Your antivirus definitions should generally remain intact, but it’s always good to run a quick scan after a restore.
Think of a restore point as a safety beacon. You create it when your system is running perfectly, so if anything goes wrong later, you can easily navigate back to that known good state.
Step 1: Ensure System Protection is Enabled
Before you can create a restore point, System Protection must be enabled for your system drive (usually the C: drive). This feature is what allows Windows to create and save restore points.
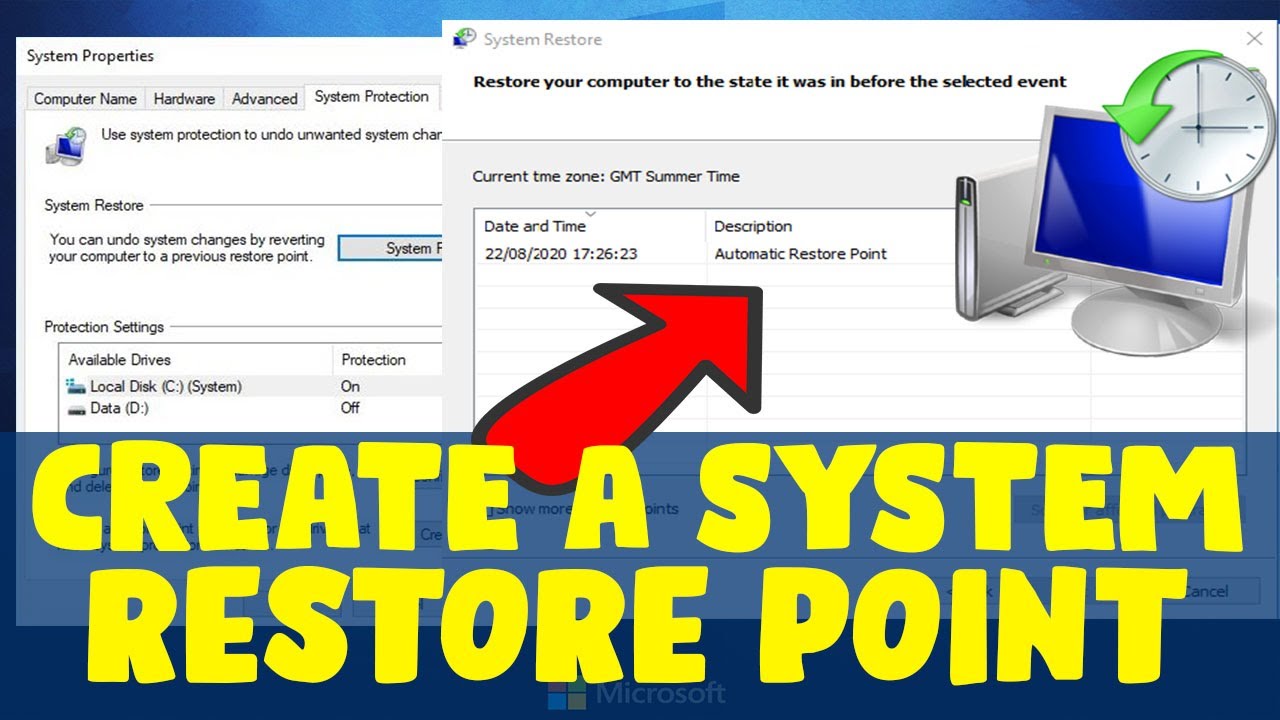
- Open System Properties:
- Type “Create a restore point” into the Windows search bar (bottom-left of your screen) and select the corresponding search result. This will directly open the “System Properties” window to the “System Protection” tab.
- Alternatively: Right-click on the Start button, select “System,” then scroll down and click on “System Protection” (under “Related links” or “Device specifications”).
- Check System Protection Status:
- In the “System Properties” window, under the “System Protection” tab, look at the “Protection” column for your main drive (typically (C:) (System)).
- If it says “On,” you’re good to go. Proceed to Step 2.
- If it says “Off,” you need to enable it.
- Enable System Protection (if needed):
- Select your system drive ((C:) (System)).
- Click the “Configure…” button.
- In the new dialog box, select “Turn on system protection.”
- Adjust Disk Space Usage: You’ll see a “Max Usage” slider. This determines how much disk space is allocated for restore points. A larger percentage allows for more restore points. Typically, 5-10% of your drive space is sufficient for most users. If you have a small drive, consider 3-5%. As older restore points are created, they will automatically overwrite the oldest ones once the max usage is reached.
- Click “Apply” and then “OK.”
- Click “OK” again to close the System Properties window.
Step 2: Manually Create a Restore Point
Now that System Protection is enabled, you can create a restore point whenever you deem necessary. This is highly recommended before:
- Installing new software that might be unstable.
- Updating device drivers.
- Making significant changes to your system settings.
- Applying major Windows updates (though Windows often creates one automatically).
Steps to Create the Restore Point:
- Open System Properties:
- As in Step 1, type “Create a restore point” into the Windows search bar and select the result.
- Initiate Restore Point Creation:
- In the “System Properties” window, under the “System Protection” tab, click the “Create…” button.
- Name Your Restore Point:
- A small “Create a restore point” dialog box will appear.
- Enter a descriptive name for your restore point. Choose a name that helps you remember why you created it and what changes were about to be made.
- Examples:
- “Before installing Photoshop CC”
- “Before NVIDIA Driver Update 551.86”
- “System working perfectly – 2025-06-28”
- Avoid generic names like “My Restore Point” as they won’t be helpful later.
- Confirm Creation:
- Click the “Create” button.
- Windows will now create the restore point. This process can take a few minutes, depending on your computer’s speed and the amount of data being captured. Do not interrupt your computer during this process.
- Completion Message:
- Once finished, you’ll see a message stating, “The restore point was created successfully.”
- Click “Close.”
- Click “OK” to close the System Properties window.
You have now successfully created a restore point. It’s there, waiting to be used if you ever need to revert your system.
How to Use a Restore Point (Perform a System Restore)
If your system encounters issues after a change, you can use the restore point you created (or an automatically generated one) to fix the problem.
- Open System Restore:
- Type “Create a restore point” into the Windows search bar and select the result.
- In the “System Properties” window, under the “System Protection” tab, click the “System Restore…” button.
- Start System Restore Wizard:
- The “System Restore” wizard will open. Click “Next.”
- Choose a Restore Point:
- You’ll see a list of available restore points.
- If you don’t see the one you want, check the box “Show more restore points.”
- Select the restore point you wish to use. Look for the date, time, and the description you provided when creating it.
- Click “Next.”
- Confirm Restore Point:
- The next screen will show you the details of the selected restore point.
- Click “Finish.”
- Final Confirmation and Restart:
- A warning message will appear, stating that System Restore cannot be interrupted once it starts and that your computer will restart.
- Click “Yes” to confirm and begin the restore process.
- Your computer will restart and perform the restore. This can take some time. Do not turn off your computer during this process.
- Restoration Complete:
- After the restore is complete and your computer reboots, you will see a message indicating that System Restore completed successfully.
- Check if your system issues are resolved.
Important Considerations and Best Practices
- Don’t Rely Solely on Restore Points: While valuable, restore points are not a substitute for regular data backups. They only restore system files and installed programs, not your personal documents. Always back up your important files to an external drive or cloud storage.
- Automated Restore Points: Windows often creates automatic restore points before significant events like major Windows updates or driver installations. However, manually creating one gives you precise control.
- Disk Space Management: Monitor the disk space allocated for System Protection (Step 1, Configure). If it’s too small, older restore points will be quickly overwritten. If it’s too large, it consumes unnecessary space.
- Troubleshooting When Unbootable: If your Windows PC won’t boot at all, you might still be able to access System Restore from the Advanced Startup Options (Windows Recovery Environment). You can usually get there by forcing your PC to shut down three times during boot, or by booting from a Windows installation USB drive and choosing “Repair your computer.”
- System Restore vs. Reset This PC: These are different. System Restore aims to fix software problems by reverting system files to an earlier state, keeping personal files. “Reset this PC” (found in Settings > Update & Security > Recovery) reinstalls Windows entirely, with an option to keep or remove personal files. “Reset this PC” is a more drastic measure for more severe issues.
By regularly creating restore points and understanding how to use them, you gain a powerful tool to maintain the stability and health of your Windows system, giving you peace of mind when making changes to your computer.